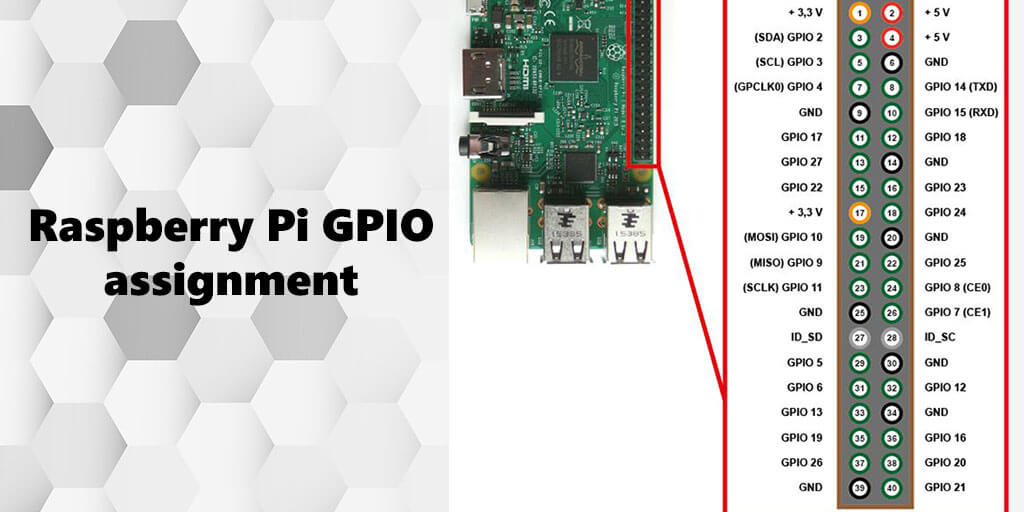
Occupancy GPIO for Raspberry Pi (Raspberry Pi GPIO assignment)
Description of the individual GPIO pins
Of the total of 26 or 40 pins (depending on the models) of the GPIO header, 17 or 26 pins can be programmed as either input or output, allowing them to be used for a variety of enhancements and electronic and digital circuits. The remaining pins are for power and other purposes.
3.3 volts through pins 1 and 17
At pins 1 and 17 are about 3.3 volts. Of course, it makes sense to supply power to external electronics. The problem with this is that this is only possible to a limited extent, because the voltage decreases due to the current drain and therefore not necessarily applied 3.3 volts.
The safest and more stable way for the whole system is to operate external circuits via an external power source. Everything else can work, but not necessarily.
5 volts across pins 2 and 4
At pins 2 and 4 are about 5 volts. Of course, it makes sense to supply power to external electronics. The problem with this is that this is only possible to a limited extent, because the voltage decreases due to the current drain and thus there is no longer necessarily 5 volts.
The safest and more stable way for the overall system is to operate external circuits via an external power source. Everything else can work, but not necessarily.
Further information
- Some GPIO pins are directly connected to the processor. A short circuit can completely destroy this and thus Raspberry Pi. GPIO pins must always be wired with a current limit.
- At the power pins for + 5V and + 3.3V, a voltage is applied even if Raspberry Pi is turned off or shut down.
- GPIO 2 and GPIO 3 (pins 3 and 5) each have an internal 1.8 kOhm pull-up resistor installed. For the other GPIOs, the internal, switchable resistors have a value of 50 to 60 kOhm.
- Everything under 0.8V is low, everything over 1.3V is high, remark: everything over 3.3V is deadly for Raspberry Pi!
General information about GPIO pins on Raspberry Pi
General information about electrical properties, programming, power supply via GPIO, safety instructions and wiring of the GPIOs. Here are also the basics of the power supply of Raspberry Pi to consider.
GPIO – General Purpose Input Output
Basics of Raspberry Pi power supply
Connect GPIO
Information about how to connect the GPIOs as input (with switch or push-button) and output (with transistor), as well as the maximum removable current per GPIO pin.
Pull-up and pull-down resistor at the GPIO input
Explanation of why GPIO inputs need to be wired with a pull-up or pull-down resistor, how large the resistor must be, and what effects will occur if the resistor is omitted.
Control and program GPIO
It is about the software-side setting of the GPIOs as input or output, as well as the evaluation and setting of the states.
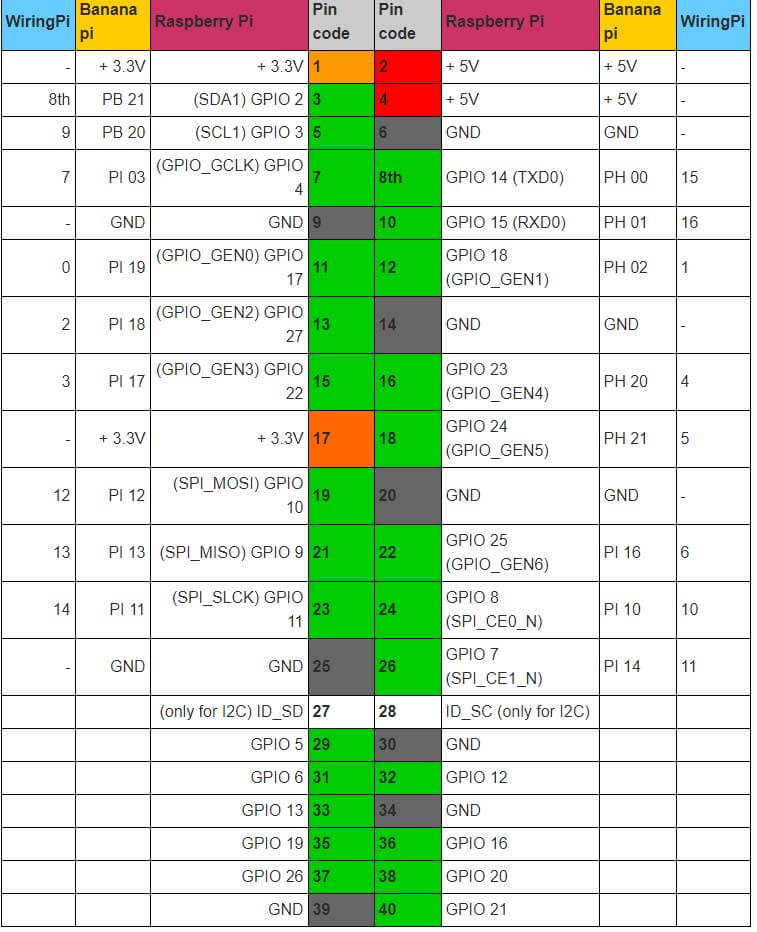
Occupancy GPIO for Raspberry Pi, Banana Pi and WiringPi in comparison
Unfortunately, the numbering of GPIO pins is a nightmare. The pins of the processor and the numbering of the GPIO pins are thrown together. Unfortunately, not all programs use the same name. Almost every program uses different names.


Leave a Reply