WiFi signal enhancement
How to strengthen wifi signal? There are situations when we have access to a WiFi network (there is a password), but the signal is weak and not all of our devices can work stably or even connect to a wireless network. This can be encountered both when using neighboring WiFi from the house opposite, and in quite legitimate situations – for example, in a hotel there is one access point to the whole floor (or even in the lobby). As a result, for example, a laptop can connect to a WiFi network with a weak signal, and a mobile phone simply does not see it.

How to strengthen wifi signal
Some routers have a repeater function (tutor) and they can be used to amplify a weak WiFi signal. But the router with the WiFi signal enhancement function is not always available (especially when traveling), so I’ll consider a slightly different option.
Absolutely no additional hardware can not do. But we will use what is usually always at hand at the wireless network pentester:
- computer (laptop)
- 2 WiFi adapters
One of the wireless cards must be sufficiently powerful and sensitive – an external wireless card with a reinforcing (and even better with an amplifying and directional) antenna, and the second must support AP (access point) mode – but it doesn’t have to be powerful enough – it’s built into the WiFi laptop adapter, since its task will be to distribute WiFi Internet within the room. In general, the standard gentlemanly recruitment auditor WiFi networks – nothing special – probably, each of us already have it all.
The algorithm to strengthen wifi signal is as follows:
using a more powerful WiFi card, we connect to a remote access point.
Using the second WiFi card, we create a new access point that uses the Internet connection first. Our “weak” devices (mobile phones) will be able to connect to this new access point. As a result, although the mobile phone connects to our access point with a stable strong signal, it will use the Internet of a distant access point with a “weak” signal. Internet access will also be on the computer itself.
Stage 1: Getting a stable connection to a remote Access Point
It is necessary to achieve a stable connection to an access point with a weak signal. To do this, move the WiFi adapter (if it is external and if the length of the cord allows) around the room, and also rotate the directional antenna (if you have one) in different directions.
You can monitor the network quality using indicators, as well as using the ping command, or Internet connection speed checking services
Stage 2: Gain a wireless signal in the settings of the router
This is an optional step. If using the Router Scan by Stas’M or RouterSploit tool you managed to gain access to the admin panel of the router, you can change the signal level in the wireless network settings.
This setting may be called TX Power (as in the screenshot below, where I set the value to High), or in some other way (the ratio of performance and energy savings, etc.).
To use any of these tools, you need to know the IP address of the router. When you are connected to an access point, in Linux the IP router can be found with the command
ip route
The address of the router will be after default via , for example, 192.168.1.1.
In Windows IP router can be found with the command:
ifconfig
Stage 3: Connecting to a remote access point, setting up your access point
The following information is intended for Linux users.
All the actions we will do on the command line – there we will quickly get the desired result than if we try to make the necessary settings in the Network Manager.
I use Kali Linux as an operating system. Actions in other Linux operating systems are similar, but you need to install the wpasupplicant and create_ap packages yourself.
In Kali Linux, you need to install a number of packages. To do this, run the following commands:
sudo apt install wpasupplicant
sudo apt install haveged hostapd git util-linux procps iproute2 iw dnsmasq iptables
git clone https://github.com/oblique/create_ap
cd create_ap
sudo make install
cd .. && rm -rf create_ap
Stop the Network Manager, because it will only hinder us:
sudo systemctl stop NetworkManager
Note , after disabling NetworkManager, the Internet will disappear!
We need to create a configuration file for connecting to an access point with a conditionally weak signal. This is done by the command:
wpa_passphrase ap_name password> configuration_file
For example, for AP 4G Home WiFi_188538 password 0988811692 and the configuration file I want to call wpa_4G_Home.conf, then the command has the following form:
wpa_passphrase "4G Home WiFi_188538" 0988811692 > wpa_4G_Home.conf
A file should be created with something like this:
network={
    ssid="4G Home WiFi_188538"
    #psk="0988811692"
    psk=f424d184c82c0993ff5770935ed8e4133029c3328717d45bf140243fcdbd6880
}
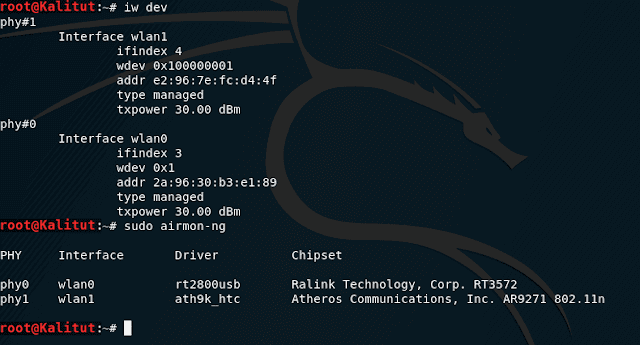
If this is not done yet, connect both of your wireless cards to your computer, see the names of the wireless interfaces with the command:
iw dev
If you do not understand which card has which name, then more clarity can give:
sudo airmon-ng

So, I have two interfaces, wlan0 and wlan1 .
To connect to a remote access point, I want to use wlan1. Therefore, I will use the remaining wlan0 interface to raise my access point.
Connecting to a wireless access point from the console is done with a command that looks like:
sudo wpa_supplicant -B -i interface_name -c configuration_file.conf
In my case, this is a command.
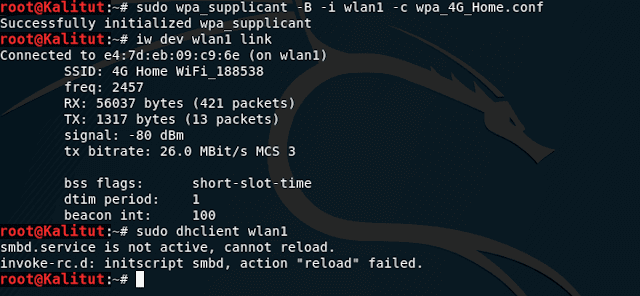
sudo wpa_supplicant -B -i wlan1 -c wpa_4G_Home.conf
Here -B means translate the process into the background. After the -i switch there is the name of the wireless interface wlan1 (replace with the name of your interface) And after the -c switch, the wpa_4G_Home.conf configuration file is specified, which you also need to replace with your own ..
If something goes wrong, then run the same command without the -B switch to view its detailed output.
To make the Internet work, you need to execute this command (pay attention to the name of the interface wlan1 – which, if necessary, replace with the necessary one):
sudo dhclient wlan1
But even before it, you can check if there is a “connect” command (if necessary, replace wlan1 with the name of your interface):
iw dev wlan1 link

With the help of ping we will check that there is indeed an Internet connection:
ping google.com

We proceed to setting up our own access point, to which our phones and other devices with low-power WiFi transmitters will be connected.
We will use the create_ap script which will greatly simplify our task.
Run create_ap as follows:
I want to create an AP named “KaliTut” on the wlan0 interface using the wlan1 interface for Internet access, then my command is:
sudo create_ap wlan0 wlan1 Kalitut
If a string appears
wlan0: AP-ENABLED
then everything went well.
The command above creates a AP, the connection to which is not password protected, if you want to create a password-protected AP,
For example, in order for my AP to have the *co256/snA password then use a command like this:
sudo create_ap wlan0 wlan1 KaliTut *co256/snA
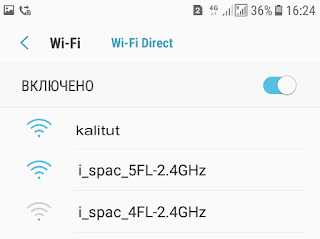
Now on mobile devices you will see the access point you created, when connected to which mobile devices will have access to the Internet. Please note that the 4G Home WiFi_188538 access point, which is the “donor” of the Internet, cannot be seen by the phone.

If you have problems with access to the Internet, then first of all check the connection to the access point with a weak signal, because in this scheme it is the weakest link that can cause problems.

Leave a Reply