
Raspberry Pi Connect GPIO input with 5 or 12 volts

The input and output level of a GPIO of Raspberry Pi for “High” is at a voltage of 3.3 volts. But if you have a larger input level then you can not apply this voltage directly to a GPIO. The GPIO would be overloaded and broken.
With a simple voltage divider, you can divide down too much input voltage to 3.3 volts. In this example, we use the common voltages of 5 and 12 volts.
Circuit for an input signal of 5 or 12 volts
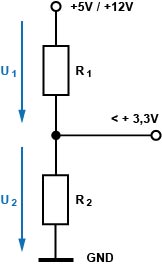
Since a GPIO input only tolerates a maximum of +3.3 V, the input voltage must be reduced. For this purpose, a voltage divider of two or more resistors is suitable. A voltage divider consists in the simplest case of two resistors. It is a series connection.
Since the current in the series circuit is the same everywhere, cause the unequal resistors different voltage drops. These partial voltages (U1, U2, …) behave like the associated resistors (R1, R2, …). This means that the greatest resistance falls off most of the total voltage. At the smallest resistance, the smallest part of the total voltage drops.

This means that if one has the ratio of the two partial stresses, one can, if one resistance is given, calculate the other in proportion.

Task
- Calculate the resistance R 1 with an R 2 of 10k Ohm and a total voltage of 5 volts.
- Calculate the resistance R 2 at an R 2 of 10k Ohm and a total voltage of 12 volts.
Solution for an input level of 5 volts
Given are:
- Total voltage U tot = 5V
- Partial voltage U 2 = 3.3V
- Resistance R 2 = 10k Ohm
We are looking for:
- Partial voltage U1 =?
- Resistance R1 =?
Calculation of the partial voltage U1 :

Solution for an input level of 12 volts
Given are:
- Total voltage U tot = 12V
- Partial voltage U 2 = 3.3V
- Resistance R 2 = 10k Ohm
We are looking for:
- Partial voltage U 1 =?
- Resistance R 1 =?
Calculation of the partial voltage U 1 :

Calculation of resistance R 1 :

Solution: Choosing the right resistor
However, there is a problem with the calculated resistance. The exact resistance value does not exist. He is not necessary. Since Raspberry Pi detects at most 3.3 volts at a GPIO input, but also less than 3.3 volts as a logical “high”, the resistance may also be slightly larger.
For a calculated resistance R 1 of 5.677k ohms we choose a resistance value of 5.6k Ohm (E12 or E24).
For a calculated resistance R 1 of 26.364k Ohm we choose a resistance value of 27k Ohm (E12 or E24).
Solution: offset
In order to check whether the input level for the GPIO is not too small due to the voltage divider, we calculate the voltage U 2 with the calculated values. The voltage U 2 must not be less than 1.3 volts.

Leave a Reply