In order for dual-band WiFi adapter with the rtl8812au driver to be used in the Kali Linux, you need to install rtl8812au driver.

Although there are few WiFi adapters that can be put into Monitor mode, those that use RealTek’s RTL88xxAU chipset are particularly well known as “capable”.
however the driver need to be installed in Kali Linux to work and to be able to start monitor mode,
to do so please follow this tutorial step by step..
install rtl8812au driver
The wireless network card is a USB interface, and the chip model is Realtek RTL8811AU. If the wireless network card is placed in the Windows environment, it can be plug and play without installing a driver. But if it is placed under Linux, it may involve reloading the driver. At least, it is so under Kali Linux.
The following methods are fully applicable to rtl8812AU, rtl8821AU and rtl8811AU installed in Linux, other USB wireless NIC drivers should be similar, the detailed process is as follows (please use root privileges for the following operations):
You can follow this tutorial video or check the details below
Install rtl8812au driver
Install linux headers in Kali linux
Because the kernel of the Kali Linux system itself is not very complete, some things are reduced. The kernel header file linux-headers is reflected here, which needs to be installed manually. Other operating systems are similar. This file should be used when installing the driver for a while. The following are the commands for the installation.
apt-get update && apt-get upgrade
Before installation may need to update the software source
If the depot inside the child does not correspond to the first document, the next step may not be successful
which means you must to choose a suitable source software for their own
apt-get install linux-headers-$(uname -r)
Through the above steps, we should already have the kernel header file installed.
Download rtl8812au driver
To download the source code, you first need to install the git tool on your own linux (kali comes with it), of course, we can also go directly to the online download, but the method is a bit too low, I do not recommend. We can go directly to the official website to download and install, but here is a lazy, use the command:
apt-get install git
Next, what you need to do is clone the source code:
git clone https://github.com/aircrack-ng/rtl8812au

Install DKMS
DKMS (Dynamic Kernel Module Support) is a tool for automatically compiling and installing kernel modules and managing things such as drivers that directly access kernels
apt-get install dkms

now to install the driver go to rtl8812au directory
cd rtl8812au
Install the driver In the directory you moved earlier
sudo ./dkms-install.sh
Uninstall the driver ? In the same directory as before
sudo ./dkms-remove.sh
When driver installation is completed, if you connect the WiFi adapter to the “Kali Linux” VM, the Wi-Fi item will appear in the network connection indicator in the upper right, and you can select the connection destination.
to check if the driver was installed type this command:
dkms status

Now reboot the operating system and execute the following commands to get the driver to work:
reboot
## disconnect wifi adapter
## reconnect wifi adapter
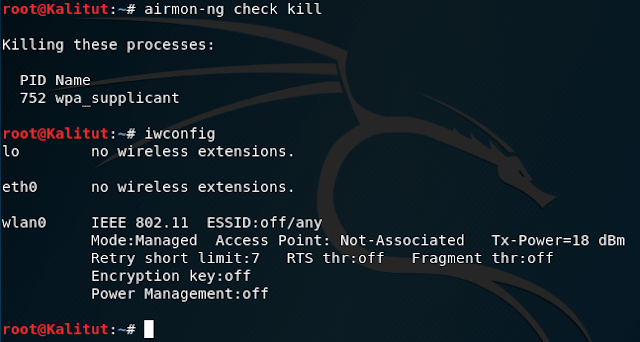
airmon-ng check kill
iwconfig

Next, let’s put the WiFi adapter into monitor mode:
sudo ip link set wlan0 down # disable Wi-Fi interface wlan0
sudo iwconfig wlan0 mode monitor # translate the wlan0 interface into monitoring mode
sudo iwconfig wlan0 txpower 30 # if you need to increase the output power up to 30 dBi
sudo ip link set wlan0 up # turn on wlan0 wifi interface
check for monitor mode

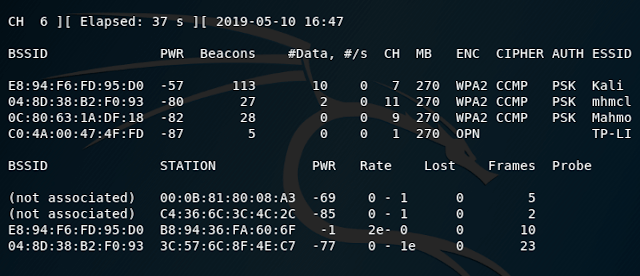
Let’s scan Wi-Fi networks:
airodump-ng wlan0

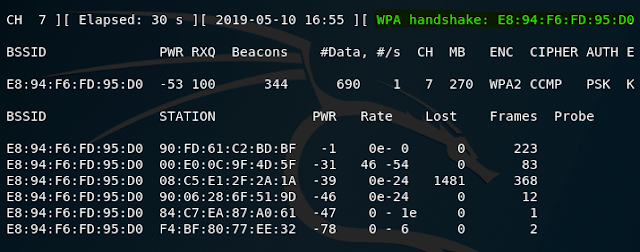
now let’s capture handshake
with this command as i’m targeting Kali wifi network
airodump-ng wlan0 --bssid E8:94:F6:FD:95:D0 --channel 7 --write test-ap

As you can see, everything works.
If you are looking for RTL8812au adapter please check Best rtl8812au WIFI adapter and make sure to check our list of best laptop for kali Linux

For anyone who can’t make this work, I used this:
Once the git link is cloned and you have cd into the directory:
dkms status
If the module is marked as added, instead of install as in the walk-through, use:
dkms install -m “Name of module you just got with dkms status” -v “version number of dkms status”
it will take a while, then you can verify it’s installed with one last:
dkms status
Hi, I still cant get it to work, the cloned files does not contain any installation script and DKMS status returns nothing.
Any idea how i can solve this?
Thank you
Please try to follow this video
https://www.youtube.com/watch?v=JiuW0Tc26ko
Check the github page. They provide adequate information on how to install the module.
I have a stupid question, I have a Centos 8.5 system and I have
built and installed the 8812au-5.6.4.2_35491.20191025 driver
from github.com/aircrack-ng/rtl8812au.git. In order to make the
build work properly I had to enhance three #if statement to reflect
some Redhat backported changes. I use the driver with a TP-Link
Archer T2U Nano and it works just fine. My Question, who should
I send a patch file with my changes to?
Thanks, AG
very helpful. the install script is no longer accurate with latest version i installed, but i found this in the readme. hope it helps.
sudo make dkms_install
Thank you! this worked…
./dkms-install.sh does not exists.
did you get it to work ??
cause i am having the same issue right now
Use the comand below:
sudo make dkms_install
Skol!