Setup VNC server over secure SSH connection
By default, VNC sessions can be reached on ports 5901, 5902, 5903, and so on. Where the last digit of the port number corresponds to the number of the VNC session.

Authentication of the VNC session is usually done by a password. Under certain circumstances, the remote desktop is also protected by username and password. But the authentication and its transmission, as well as the transmission of the subsequent VNC session is unencrypted. This means that an attacker can access the login data and also the VNC session from the data stream.
Solution: Secure VNC server
For VNC sessions that take place exclusively on the local network, this may not be a problem. But if you set up VNC sessions over the Internet, then the login data is transmitted unsecured.
If the VNC server is started with the parameter “-localhost”, then you can prevent the VNC server from being reached via an insecure connection.
vncserver: 1 -localhost
With this parameter, the VNC server can only be accessed locally and no longer via the network. The user is thus forced to first establish a hopefully secure connection to the VNC server. For example, by SSH tunneling.
Solution: SSH tunnel via SSH client on the command line
Setup of an SSH tunnel via SSH client (on the command line).
ssh -L 5901: localhost: 5901 -N -f -l pi raspberrypi.local
Or:
ssh -L 5901: localhost: 5901 -N -f -l pi 192.168.1.1
Note: IP address or computer name may need to be adjusted.
Solution: SSH tunnel via VNC client
On the command line, it may not be a problem to set up a VNC connection over SSH. In general, however, you have a graphical VNC client. This raises the question of whether he offers the options for an SSH tunnel or not. Unfortunately, many VNC clients can not.

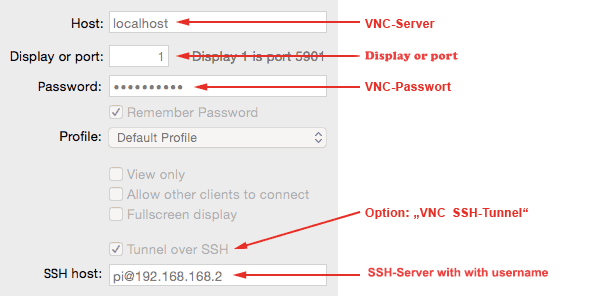
In this example, the “…” option must be activated in the VNC client. For this, the SSH host address must be entered together with the user name. The VNC host address in this case is no longer the computer name or the IP address, but “localhost”.
The process of connection establishment is as follows:
- The VNC client first connects via SSH. In this case, the authentication takes place via user name and password of a user on Raspberry Pi. As a rule, one is asked for the password of the specified user.
- After successful user authentication, the VNC client connects to the localhost. Depending on the configuration, you will be asked again for the VNC password.
- After that, the VNC session is encrypted and secured via SSH.

what VNC open source client do you recommend?
A client that allows to open the SSH tunnel. thanks
I use PuTTY and it’s open source with SSH tunnel support