
How to setup remote desktop on raspberry pi
In Windows, we speak of Remote Desktop Support or Remote Desktop Connection via RDP to serve a remote computer via screen transfer. If you’re working with Windows clients, setting up an RDP server on Raspberry Pi is a viable alternative to VNC. VNC is less common in the Windows world.
With RDP you have to live with the following restrictions:
- The development of open-source software depends on the RDP protocol development. That means you do not get all the features and flexibility of VNC solutions here.
- RDP is a security issue over insecure networks because all data is transmitted in plain text. So also entered usernames and passwords.
- XRDP (the Linux RDP) connects to a separate screen each session. So you can not return to the current screen or to an existing one.
Task
- Install Remote Desktop Service on Raspberry Pi.
- Start RDP session from a Windows client.
Solution: Install Remote Desktop Service
Windows Remote Desktop Service is implemented by the “xrdp” package and must be installed first.
sudo apt-get update
sudo apt-get install xrdp
Whether the Remote Desktop Service has been successfully installed and running can be checked as follows.
sudo systemctl status xrdp
The status information “Loaded: loaded” and “Active: active (running)” show that the service is loaded and automatically started.
Solution: Start the Remote Desktop session on the Windows client
Tested with Windows 10.
To build a remote desktop session, Windows has the Microsoft Terminal Services Client (MSTSC). There are three ways to access this program.
- Call the client via “Start> Run> mstsc”.
- Via the Explorer by calling “c:\Windows\system32\mstsc.exe”.
- Search for apps: “apps: mstsc”.
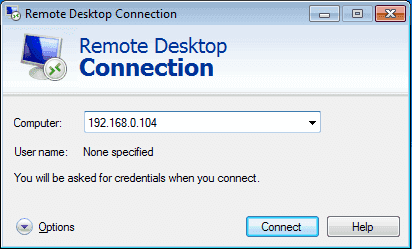
After the program has been started enter the IP address of the Raspberry Pi and click on “Connect”. Then the connection is established (confirm security question). On the illustrated desktop you then enter username and password of the user on the Raspberry Pi.
By default Xrdp uses the /etc/ssl/private/ssl-cert-snakeoil.key file which is readable only by users that are members of the “ssl-cert” group. You’ll need to add the user that runs the Xrdp server to the ssl-cert group.