
This guide is about samba on raspberry pi, Samba is a collection of networking tools to provide network resources in a Windows network. These can be shares of directories and printers that Samba provides and regulates client access to the services. Samba is not limited to Windows clients. Just as well Linux and Apple PCs can use the network shares.

Samba on raspberry pi
With Samba you can realize almost all the functions you would expect from a Windows network.
SMB – Server Message Block
The eponym for Samba is the Server Message Block (SMB) protocol. SMB is a protocol for transferring data between a client and a server. Following the client-server principle, all actions are taken by the client. The client sends a request to the server. It processes the request and makes the requested data or services available. Under Samba, the functions of SMB are provided by the daemon (service) “smbd”.
The smbd service not only provides file and print services but also provides authentication and authorization capabilities to protect username and password shares, for example.
Since 1996, Microsoft has introduced an extension called CIFS (Common Internet File System), which offers additional services in addition to file and printer sharing. To date, the SMB and CIFS protocols are used synonymously.
NetBIOS
NetBIOS is the protocol responsible for name resolution on the Windows network. It is provided under samba by the daemon (service) “nmbd”.
The service “nmbd” takes care of the name resolution and the “Browsing”, ie the possibility to search for and display available shares in the network.
Difference between Samba 3 and Samba 4
Samba is available in different versions. Usually you will work with Samba 4. In some Linux distributions but still Samba 3 can be up to date. The differences between Samba 3 and 4 are in the details, which usually are not that important. For simple directory shares, both versions are fine.
Samba 3 already supports LDAP, which also supports the Windows Active Directory introduced with Windows 2000. However, Samba 3 can not replace an Active Directory domain controller. Only with the version 4 Samba is a free implementation of the directory service Active Directory of Microsoft. This means that with Samba 4 you can set up an Active Directory domain controller.
Version 2 (SMB2) of the SMB protocol was introduced with Windows Vista. Since Samba 3.5 there is experimental support for SMB2. Since Samba 3.6, the SMB2 protocol is fully supported.
Since Windows 7, the SMB version 3 is used. This is supported since Samba 4. But not all functions. It can be assumed that in the course of time, the range of functions will increase.
An important feature of SMB3 is the encryption of data transmission, which is supported by Samba 4.
Samba 4.3 talks about SMB version 3.1.1, which Microsoft introduced with Windows 10. It promises greater security in the negotiation of SMB dialects and functions.
Under Raspbian Wheezy only Samba 3 is available. That’s fine if you can do without an Active Directory domain controller. For easy directory sharing, Samba 3 will do just fine. Since a domain controller would be completely oversized.
If you use Raspbian Jessie, you should also use Samba 4. Even if you only need a simple file server. The basic configuration of Samba 4 is much easier. In addition, Samba 4 is the only version that is still being actively maintained.
Samba configuration
All functions and features provided by Samba via the SMB protocol and NetBIOS are set via the central configuration file “/etc/samba/smb.conf”. Here, all shares of directories or printers and the control of permissions are set.
sudo nano /etc/samba/smb.conf
Control Samba services
Samba consists of two services. Namely “smbd” and “nmbd”. And that’s exactly what you have to consider when starting, stopping, restarting the services and reloading the configuration. If necessary, you have to treat both services separately. restart samba raspberry pi
sudo service smbd start
sudo service smbd stop
sudo service smbd restart
sudo service smbd reload
sudo service nmbd start
sudo service nmbd stop
sudo service nmbd restart
sudo service nmbd reload
Note: It may be advisable to only reload the configuration (“reload”). When restarting services, all clients lose connection to the server. This can lead to data loss.
install samba sharing on Raspberry Pi
how to install samba raspberry pi
The goal is to run Raspberry Pi as a file server, which can be accessed via Windows Explorer. The most suitable software solution for this is a Samba server. With Samba almost all functions of a
Windows server can be realized.
This includes:
- File and directory shares (Shares)
- Printer releases
- Primary Domain Controller for NT (Samba 3)
- Active Directory Domain Controller (from Samba 4)
tasks
- Install Samba server.
- Samba server Basic configuration.
- Setup directory shares.
- Set Samba password for user.
Preliminary note to the following solutions
Compared to the usual tutorials and instructions for setting up Samba shares, this guide is a little more extensive. The reason is that a directory share is not the same as directory share. In general, you can share a directory with all users, for a specific group of users, or for a single user. In this guide, we consider all three possibilities. In each individual case, it is about who has which permissions must be set. This will save other instructions. But this is where the problems lie, if you want to set up individual releases yourself.
The following solution works with Raspbian Wheezy (Samba version 3) and Raspbian Jessie (Samba version 4).
Install Samba server Raspberry Pi
Relevant for the Samba server are the packages “samba” and “samba-common”. The package “smbclient” would not be necessary on a server. However, it has the advantage that you can test the shares locally on the server. This simplifies troubleshooting.
sudo apt-get update
sudo apt-get install samba samba-common smbclient
Depending on the system, downloading and installing may take some time. It does not hurt to bring a little patience.
Then we check if Samba is running.
sudo service smbd status
sudo service nmbd status
The output should be that the services “nmbd” and “smbd” are running.
Samba server Basic configuration
For the basic Samba configuration there is a central configuration file “/etc/samba/smb.conf”. This file is extremely extensive in the pre-configuration and therefore confusing. For a simple basic configuration, it is recommended to rename and rebuild the file.
sudo mv /etc/samba/smb.conf /etc/samba/smb.conf_old
sudo nano /etc/samba/smb.conf
The following basic configuration is not universal, but for most applications useful and appropriate. That is, for a start it is enough. Later, it may need to be customized.
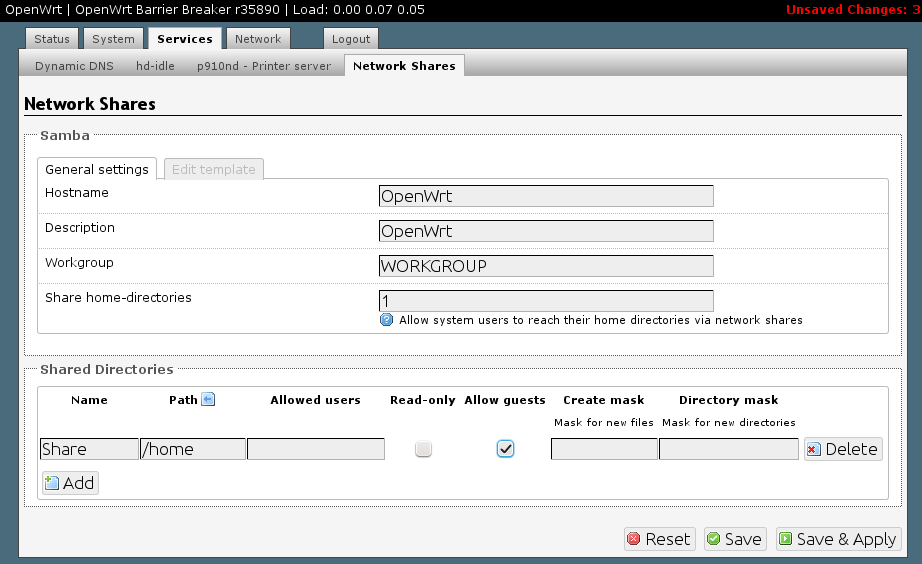
 [global]
workgroup = WORKGROUP
security = user
encrypt passwords = yes
This basic configuration specifies a globally valid configuration. This is indicated by the area “global”, enclosed in square brackets. All information given therein applies to all later configured shares.
The parameter “workgroup” specifies the name of the workgroup. This has been structured in groups of computers in Windows networks computers. Today, this parameter is no longer relevant because newer versions of Windows no longer consider this specification. It is only included for compatibility reasons. This is typically called “workgroup” or “workgroup”.
The parameter “security” indicates which security level should apply when accessing the shares. The value “user” is a good choice and states that the user management of the server should be used. This means that access to the Samba shares is subject to the configured users and their authorizations on the server.
The parameter “encrypt passwords” with “yes” ensures that the passwords are encrypted during authentication. For safety reasons, a meaningful setting that brings no disadvantages in the use with it.
The last two lines are used to log in accesses without or with incorrect access data automatically as a guest. Only then will appropriate options apply if shares are to be released for everyone.
If you have entered this basic configuration in the file, you can save and close the file: Ctrl + O, Return, Ctrl + X.
Then we test this configuration file. This has the advantage that if we enter something wrong or incorrectly, then we can avoid the false start of the Samba server.
testparm
If there is no error here, then everything is ok. Otherwise, the error has to be fixed and the file has to be tested again.
After every change to the configuration file, the Samba services must be restarted. Only then will the configuration be adopted.
sudo service smbd restart
sudo service nmbd restart
As long as the configuration is complete and correct, the Samba server will be up and running again.
Setup samba shares for directories
To set up directories, we first need a directory where we create the directories that we want to share later. In principle, it does not matter where the folder is located. Quite well is the home directory “/ home” in which we create a directory with the name “shares”. Here then the directories are created, which should be released.
sudo mkdir /home/shares
Then we create the directories that we want to release later and set the appropriate permissions.
Not all directories need to be created. You can also choose one for your own purposes and leave out the others.
General directory for everyone to test:
sudo mkdir /home/shares/test
sudo chown root: root/home/shares/test/
sudo chmod 777 /home/shares/test/
Directory only for the user group “users”:
sudo mkdir /home/shares/users
sudo chown root: users/home/shares/users/
sudo chmod 770 /home/shares/users/
Directory only for the user “pi”:
sudo mkdir /home/shares/pi
sudo chown pi: pi/home/shares/pi/
sudo chmod 700 /home/shares/pi/
Then we open the Samba configuration file and enter the shares there.
sudo nano /etc/samba/smb.conf
Again, just enter the shares for which the directory was created.
[Samba Test]
comment = Samba test release
path = /home/shares/test
read only = no
 [Samba Users]
comment = Samba Users Share
path = /home/shares/users
read only = no
 [SambaPi]
comment = Samba Pi release
path = /home/shares/pi
read only = no
The name of the share is enclosed in square brackets. This simplifies administration and access to the share.
The file must then be saved and closed: Ctrl + O, Return, Ctrl + X.
After changing the configuration file, a test is recommended.
testparm
If the test was successful then Samba needs to be restarted.
sudo service smbd restart
sudo service nmbd restart
This makes sharing available on the network. However, the authorization to access it is still missing. What is meant is that for the user or users still Samba passwords must be set up.
Setup Samba password for users
For authentication, the user management is provided on the server. However, Samba uses only the configured usernames and file and directory permissions. Not the passwords. For each user who wants to use Samba shares, one must set up a separate password for Samba. Here we select the user “pi” as an example.
sudo smbpasswd -a pi
After entering the password you have to enter it a second time to check it. Then you can access the share.
Disable “pi” user for Samba:
sudo smbpasswd -d pi
Reactivate user “pi” for Samba:
sudo smbpasswd -e pi
Samba shares and mount – fstab
samba share raspberry pi mount/unmount automatically with “fstab”
In principle, a Samba share always consists of two sides. The server side and the client side. The Samba server was configured successfully in the best case. Now it’s about setting up or automatically mount the shared directory to the local file system of a client or other server.
Task
- Check if the kernel supports the Samba file system.
- Check access to the remote Samba file system.
- Create a mount point on the client.
- Create an entry in the file “/etc/fstab”.
- Check if the Samba shares are automatically included.
preparations
- In order to mount Samba shares, they must be set up beforehand.
- Make sure that the shared directories on the Samba server contain files or other directories so that you can really check later if the shares have been incorporated correctly.
- Set up Samba sharing on Raspberry Pi
Solution: Check available support for file systems
For a file system to be recognized and mounted on a drive, the appropriate file system modules must be installed. For this purpose, one should check which file systems the running kernel supports.
ls -1 /lib/modules/ $ (uname -r) /kernel/fs
In order to access Samba shares, one needs the file system “cifs”, which is contained in the package “cifs-utils” and which should be present at Raspbian Jessie. If not, then you can install it later.
sudo apt-get install cifs-utils
Solution: Check remote Samba share
First, we should check if the samba share is even reachable. For this we install a Samba client for the command line, if it is not already installed.
sudo apt-get update
sudo apt-get install smbclient
Command to check if the Samba shares are reachable:
smbclient -N -L //192.168.1.2/
smbclient -N -L raspberrypi
Now we go one step further and check if a user login is possible.
smbclient -U pi -L //192.168.1.2/
The command line will probably ask for a password. This is the password that the user got “pi” in the Samba user administration. Not the local user, but really the samba user.
Solution: Create a mount point
To include a share, you must first create a mount point. This can in principle be selected at any point in the file directory. However, the usual procedure is as follows:
- System-wide integration: The mount point must be owned by root.
- Personal integration: The mount point must be the property of the respective user. It is recommended to create an empty folder in its home directory.
Create mount points in the user directory:
mkdir -p /home/pi/shares/test
mkdir -p /home/pi/shares/users
mkdir -p  home/pi/shares/pi
Solution: Create an entry in the file “/ etc / fstab” (Raspbian Wheezy)
Now it’s about assigning the partition or the file system to a mount point in the file “/ etc / fstab”. To do this, we open the following file:
sudo nano /etc/fstab
Enter the following lines:
//192.168.1.2/SambaTest/home/pi/shares/test cifs defaults, noauto, nofail, username = pi, passwd = raspberry 0 0
//192.168.1.2/SambaUsers/home/pi/shares/users cifs defaults, noauto, nofail, username = pi, passwd = raspberry 0 0
//192.168.1.2/SambaPi / home / pi / shares / pi cifs defaults, noauto, nofail, username = pi, passwd = raspberry 0 0
Please note that the IP address, user name (option “username”), password (option “passwd”), the shares and mount points have to be adapted to your scenario.
If you have made or changed the entry, then save the file and close it with Ctrl + O, Return, Ctrl + X.
Then you can mount / mount the shares manually. The new entries in the file “/ etc / fstab” are automatically taken into account.
sudo mount -a
Check if the shares have been mounted.
lsblk
ls /home/pi/shares/test
ls /home/pi/shares/users
ls /home/pi/shares/pi
Note that these directories exist on your local system and are used as mount points. Only if the local directory content matches that on the Samba system, then the shares were successfully mounted.
Check whether the Samba shares are automatically included after a restart.
reboot
In the best case, the shares are automatically integrated already at system startup.
Solution: Create an entry in the file “/ etc / fstab” (Raspbian Jessie)
Now it’s about assigning the partition or the file system to a mount point in the file “/ etc / fstab”. To do this, we open the following file:
sudo nano /etc/fstab
Enter the following lines:
//192.168.1.2/SambaTest/home/pi/shares/test cifs defaults, noauto, nofail, username = pi, passwd = raspberry, x-systemd.automount, x-systemd.requires = network-online.target 0 0
//192.168.1.2/SambaUsers/home/pi/shares/users cifs defaults, noauto, nofail, username = pi, passwd = raspberry, x-systemd.automount, x-systemd.requires = network-online.target 0 0
//192.168.1.2/SambaPi / home / pi / shares / pi cifs defaults, noauto, nofail, username = pi, passwd = raspberry, x-systemd.automount, x-systemd.requires = network-online.target 0 0
Please note that the IP address, user name (option “username”), password (option “passwd”), the shares and mount points have to be adapted to your scenario.
Note: The mount options “x-systemd.automount, x-systemd.requires = network-online.target” will not attempt to mount unless the network connection is available and is being mounted before the network connection is terminated ,
If you have made or changed the entry, then save the file and close it with Ctrl + O, Return, Ctrl + X.
Then you can mount / unmount the shares manually.
sudo mount -a
Check if the shares have been mounted.
lsblk
ls /home/pi/shares/test
ls /home/pi/shares/users
ls /home/pi/shares/pi
Note that these directories exist on your local system and are used as mount points. Only if the local directory content matches that on the Samba system, then the shares were successfully mounted.
Check whether the Samba shares are automatically included after a restart.
reboot
In the best case, the shares are automatically integrated already at system startup.
Problem: Entries in the file “/etc/fstab” are not included at system startup
The entries in the file “/etc/fstab” should be included automatically at system startup. However, the condition is that the drive is available when processing the file. That is, the physical drive must be recognized and initialized, or in the case of a Samba share, the network connection must be available. That’s never the case. And that’s why you stumble over it. That means you have to somehow make sure that the Samba releases are subsequently incorporated.
What works in any case is to subsequently integrate the shares manually with “sudo mount -a”. However, this is exactly what you want to avoid because it is a manual intervention. Actually, you want it to work automatically.
It’s easy with Raspbian Jessie. Here it is enough to add “x-systemd.automount, x-systemd.requires = network-online.target” to the fstab line in the mount options.
If you have Raspbian Wheezy, then you have to wait with the mount until the network is “booted up”. To execute a command such as “mount -a” just before the boot process is complete, use the file “/etc/rc.local”.
The file “/etc/rc.local” is executed relatively late in the boot process, almost just before the login prompt. With Raspbian, a line for the output of the IP address is entered by default in this file.
sudo nano /etc/rc.local
...
mount -a
exit 0
However, the problem here is that it can not be guaranteed that a network connection is already possible. So it can happen that the file “/etc/rc.local” is executed before, for example, the WLAN is started up.
You can use it to install a delay until the network connection is established.
...
sleep 20
mount -a
exit 0
The “sleep” command delays the further processing of “/etc/rc.local” in seconds. The value given here must be found out by trial and error. It can be different for every system.
Advanced Samba configuration
How to configure samba for file or directory share is setup with Samba with little configuration overhead. Many configuration options are optimally set by default.
The following also discusses the default configuration of some options. So configuration options that you really do not have to specify. But there are reasons why you should set one or the other parameter anyway. When updating or switching to a new Samba version, it sometimes happens that options set by default get a different value, so sometimes the Samba shares do not work as usual.
- User Authentication
- user management
- Create user for Samba
- Password change by the user
- Set up WINS server
- Set NetBIOS name
- NetBIOS communications
The following expanding Samba configurations are not meant to be step-by-step instructions, but are optional configuration options.
It is assumed that the following configurations are done as user “root” or as normal user with the command line suffix “sudo”.
It is also assumed that the user knows how Samba works, how it should be configured and what needs to be taken into account. The configuration usually takes place in the central configuration file “/etc/samba/smb.conf”.
samba User Authentication
The default setting for Samba is
security = user
Use encrypted passwords (default):
encrypted passwords = yes
samba user management
The following user management statements apply to Samba 3 and Samba 4 in Classic mode. That is, without a domain controller.
In order to access the Samba shares, each Samba user must have a local user account on the Samba server and an additional Samba account.
User information is managed through the user account and access through the Samba account.
The administration of the Samba account is done by “smbpasswd” in a file, by “tdbsam” in a local database or centrally via an LDAP server. If you only want to set up a workgroup server or just a Primary Domain Controller (PDC) on a small network, managing it via smbpasswd or tdbsam is fine.
Once you want to use Samba as a PDC and Backup Domain Controller (BDC) in a more complex environment, LDAP is a must-have for centralized user management.
When operating a single file server, local tdbsam is recommended for local user management. It is a simple database called Trivial Database. This database, in contrast to file-based management with “smbpasswd”, allows multiple users to write to the database at the same time. This is important if several users want to change their password at the same time. The recommendation is to use “tdbsam” for the user management up to a maximum of 250 users and then to switch to LDAP.
If you want to use several Samba servers as PDC and BDC, then you should definitely use LDAP as user management. But that also means you need a separate LDAP server.
In principle, you can omit the following user management configuration because they are set by default.
By default for Samba up to version 3.3.10:
passwd backend = smbpasswd
By default for Samba version 3.4 or higher:
passdb backend = tdbsam
But there is a reason why you should set the parameter maybe. If you switch from an old Samba version (until 3.3.10) to a new Samba version (from 3.4), and the parameter “passwd backend” is not set, then the user management will no longer work if another user administration is used by default Application comes. If the parameter is set, then the old user management is used. The is then outdated, but it still works after the conversion.
If you also want to change the user management from “smbpasswd” to “tdbsam” after switching from Samba 3 to 4, you can do this with the following command:
pdbedit -i smbpasswd -e tdbsam
Then you should adjust the configuration of “passdb backend” and restart Samba.
Create and manage Samba users
In the standard installation, Samba has a separate user administration system, which is administered with the “smbpasswd” command. This means that for every user who can access a Samba share, a Linux account and a Samba account must be created.
Even if a user can only access the Samba shares, but does not need a classic Linux account, a Linux account must still be created. Here is an account with limited functionality.
useradd -s /bin/ false -g users -m {USERNAME}
If the user can not log on to the Linux system, set the shell to “/ bin / false”. Because this user is not allowed to log on locally, it is not necessary to enter a password here.
If the Linux user has been created or already exists, then create the Samba user account. Here you must assign a password in any case that may differ from the password of the Linux account. The password must be confirmed a second time.
smbpasswd -a {USERNAME}
New SMB password:
Retype new SMB password:
The Samba user account is then active immediately. If not, then you have to activate the user.
Enables the user in the Samba database:
smbpasswd -e {USERNAME}
Disables the user in the Samba database:
smbpasswd -d {USERNAME}
Removes the user from the Samba database:
smbpasswd -x {USERNAME}
Password change by the user
With the program “smbpasswd” every user can change their own password.
unix password sync = yes
This default setting in the “[global]” section provides that if the user changes their Samba password, the normal Linux password will be changed as well.
Setup Samba WINS server
If a Samba server should also work as a WINS server, then add the following line in the section “[global]”:
winssupport = yes
This line ensures that the Samba server works as a WINS server in the network. If there is also a DHCP server in the LAN, make it known to the WINS server.
Set NetBIOS name
The NetBIOS name serves as the address in the Windows network environment and must be unique on the network. By default, this parameter is set by the host name of the system. It can be influenced in the Samba configuration.
Set the NetBIOS name of the machine in section “[global]”:
netbios name = {HOSTNAME}
The NetBIOS name may consist of a maximum of 15 characters, with no special characters except minus “-” and the underscore “_”.
Backup Samba configuration
A Samba configuration can be quite extensive, so a backup is recommended. The files that should be backed up are the “smb.conf” and the tdb files that store the user data and other information.
You secure it with the command:
tdbbackup /var/lib/samba/*.tdb
NetBIOS communications
After name resolution, a TCP connection is established to the server. There is a distinction between two ports. In the classic variant, where the SMB connection is via NetBIOS, port 139 is used.
The other variant does not use NetBIOS, but establishes the connection directly with SMB over TCP, using port 445.
Which protocol or which port is used can be checked with the following command on the Samba server.
netstat -l
The use of the port can be controlled. For this there is a parameter in the Samba configuration.
smb ports = xxx
Whether a local connection to one or both ports is possible, you can test with Telnet.
telnet 139
telnet 445
After calling the commands “netstat” displays a connection on the corresponding port.
netstat -pn
samba on raspberry pi Troubleshooting
Most problems are caused by incorrect or incomplete configuration of the Samba server, incorrect file and directory permissions, and incorrect username and password authentication.
- Start or stop samba properly
- User authentication failed
- No file and directory permissions
The following solutions are not to be understood as step-by-step instructions, but require knowledge of the basic Samba configuration.
Troubleshooting: Start or stop Samba properly
The following commands do not seem to work.
sudo service samba start
sudo service samba stop
sudo service samba restart
sudo service samba status
Sometimes the following error even comes up: “Failed to start samba.service: Unit samba.service is masked.” What does that mean? This means that the service / service called “samba” does not actually exist.
You have to know that Samba consists of two services. Namely “smbd” and “nmbd”. And that’s exactly what you have to consider when starting, stopping and restarting. If necessary, you have to treat both services separately.
sudo service smbd start
sudo service smbd stop
sudo service smbd restart
sudo service nmbd start
sudo service nmbd stop
sudo service nmbd restart
Samba No shares visible on the remote PC
Basically, if you have made changes to the configuration file “/etc/samba/smb.conf”, then you should also check this with “testparm”.
testparm -v
The option “-v” causes the default settings to be displayed as well.
Unless an error has been returned, the Samba services must be restarted or the configuration file re-read.
sudo service smbd restart
sudo service nmbd restart
Note: Restarting the Samba services stops any connections to the directory shares. With a reload, the connections would remain and only the configuration would be rewritten.
If the test of the configuration file with “testparm” was successful and you have not forgotten the restart of the Samba server or the reload of the configuration, there should actually be no problems with the Samba shares.
Assuming you have a working network connection on both sides, you should clarify if the Samba services are really up and running.
sudo service smbd status
sudo service nmbd status
Or:
ps ax | grep. * mbd
The list should contain “nmbd” and “smbd”.
In addition, we can check with “netstat” whether the Samba ports (137 / udp, 138 / udp, 139 / tcp and 445 / tcp) are bound to the services.
sudo netstat -tulpn | grep mbd
When the Samba services are running and listening for the right ports, then nothing ever went wrong with the installation. Otherwise you have to try to get the services “smbd” and “nmbd” up and running.
If the Samba services are running but the shares are still not visible, troubleshooting will help tremendously if the Samba client is also installed on the server.
sudo apt-get install smbclient
By specifying the host or computer name, you can check whether the Samba server can be reached. However, only the host name is resolved to the IP address.
nmblookup raspberrypi
The same also works with the specification of the workgroup or the parameter “workgroup” from the global settings of the configuration file. “raspberrypi” in this case is the hostname of Raspberry Pi.
nmblookup workgroup
It is really interesting to see which shares the Samba server provides. “raspberrypi” in this case is the host name of Raspberry Pi. You can also use the IP address.
smbclient -N -L raspberrypi
Here the releases should be listed. If not, then you should check with “testparm” the configuration. Or perform the forgotten restart of the Samba server so that the configuration can be adopted.
Now we go one step further and check if a user login is possible. The user in this case is “pi”.
smbclient -U pi -L raspberrypi
The command line will probably ask for a password. This is the password that the user got “pi” in the Samba user administration. Not the local user and not the local user on the Samba system, but really the Samba user.
Sambe User authentication failed
For authentication, the user management is provided on the server. However, Samba uses only the configured usernames and not the passwords. Therefore, a separate password must be set up with “smbpasswd”.
Show all Samba users:
pdbedit -L -w
There the appropriate user who wants to access a Samba share should be created there.
If the Samba user exists, then you should look into the comparatively confusing issue of
pdbedit -L -v
see if the field “Password last set” is empty. If this is the case, set a password via “smbpasswd”.
sudo smbpasswd -a pi
After entering the password you have to enter it a second time to check it. Then you should be able to access the share.
Note: There is some indication that the Samba version used on Raspbian Jessie does not always work with Windows 7. There are always problems with the registration.
Temporarily you can also use the instruction “guest = ok” in the section “[global]” in the central
configuration file “/etc/samba/smb.conf” to ensure that no password is requested when connecting.
Samba No file and directory permissions
Most issues have rarely been related to the configuration of the Samba server, but to the set file and directory permissions. The correct setting of file and directory permissions is extremely important.
It should be noted that the file permissions in the Samba system itself must also allow the appropriate access. The Samba rights (configuration) can not cancel the system rights.
Leave a Reply