The Raspberry Pi Zero W is the second model of a miniature single-board computer from the Raspberry Pi line.
The first model was the “regular” Zero, a tiny $ 5 computer with modest specs and no wireless modules. Given the fact that in the pursuit of miniaturization, the creators left only one microUSB OTG port, the model looked rather strange. It seems to be compact, but in order to use it more or less normally, it is necessary to weigh adapters for connecting the network adapter and keyboard, which automatically negates all the advantages of miniaturization.
Released a year later, Zero W inherited from the predecessor the dimensions and basic technical characteristics, but in addition received an integrated Bluetooth and Wi-Fi module. This slightly increased its cost, but at least it became convenient to use the updated model.
we will review and talk about how to install Raspbian on a microcomputer and connect it to a wireless network without using a monitor and keyboard.
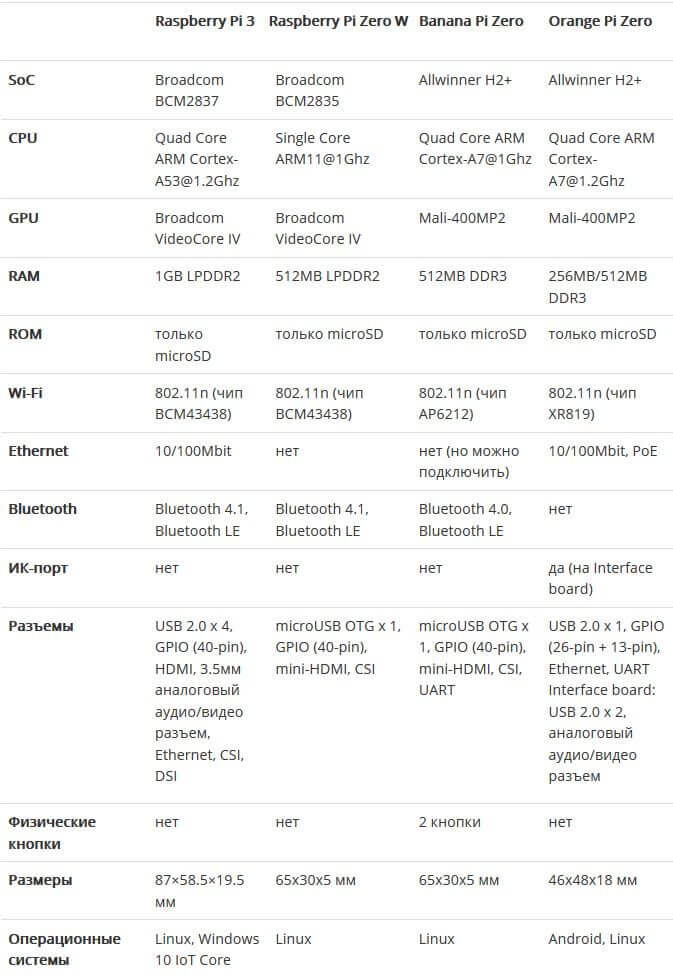
The characteristics of the Raspberry Pi Zero W are not particularly different from their closest counterparts in the face of Orange Pi Zero and Banana Pi Zero .
It is worth noting only a single-core processor (competitors have 4 cores) and the lack of an integrated Ethernet adapter. Although it’s possible in principle to connect Zero W to a wired network: you can use external network cards with a USB or GPIO connection for this.
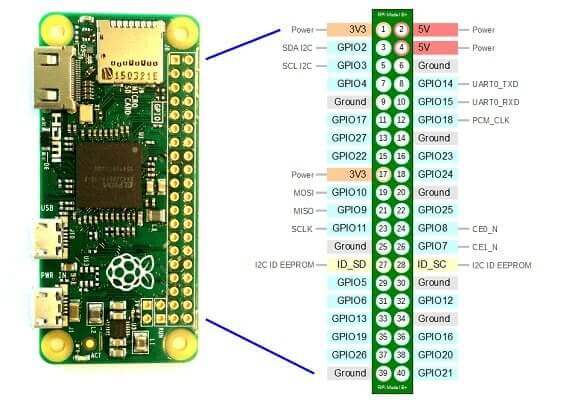
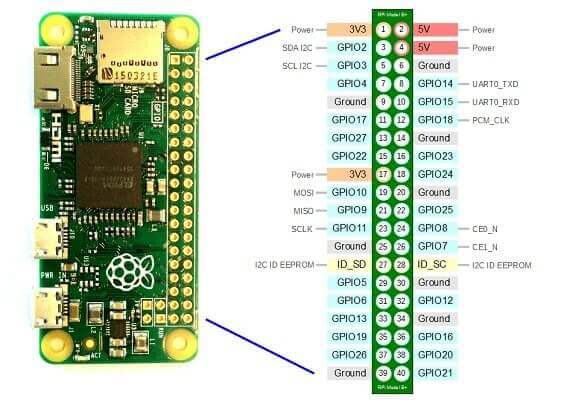
The 40-pin GPIO interface of the Raspberry Pi Zero W is identical to the GPIO on the Raspberry Pi 3. That is, all expansion cards sold for the big “raspberry” can be used on Zero W without fear of any compatibility problems.
Appearance and scope of delivery
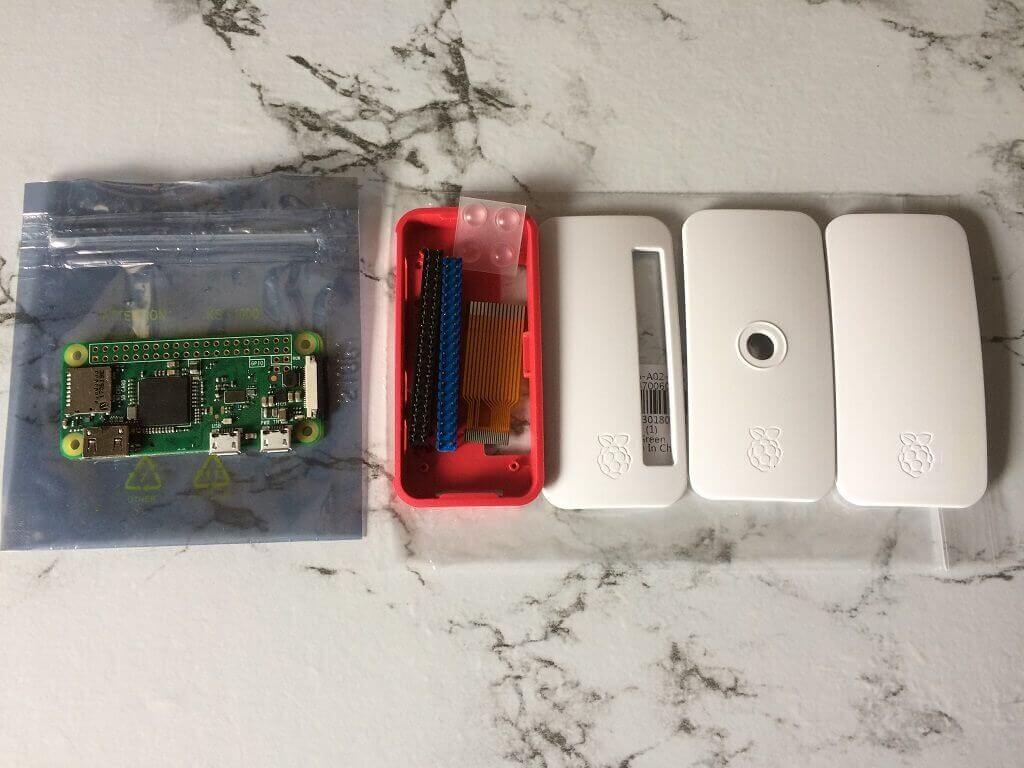
The Raspberry Pi Zero W comes in an antistatic bag.
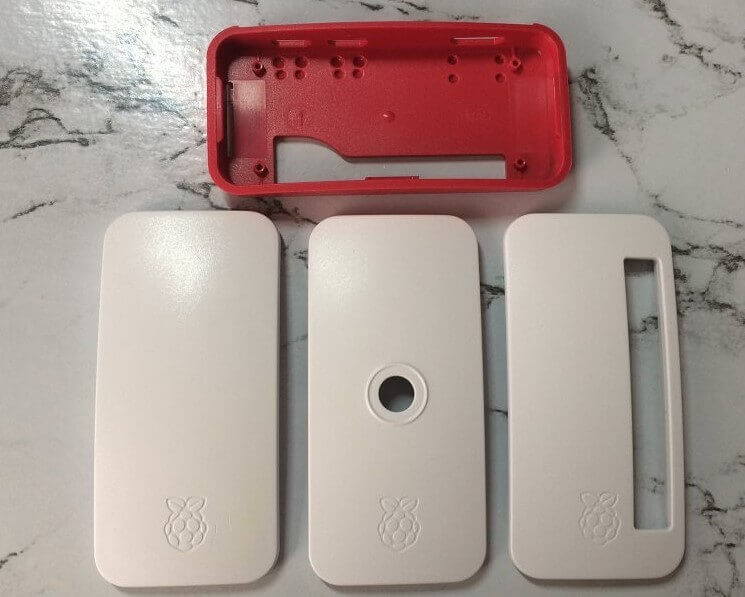
In another plastic bag there are accessories: two GPIO combs (with male and female connectors), a case with three replaceable covers, silicone legs for the case and an adapter for connecting the camera.
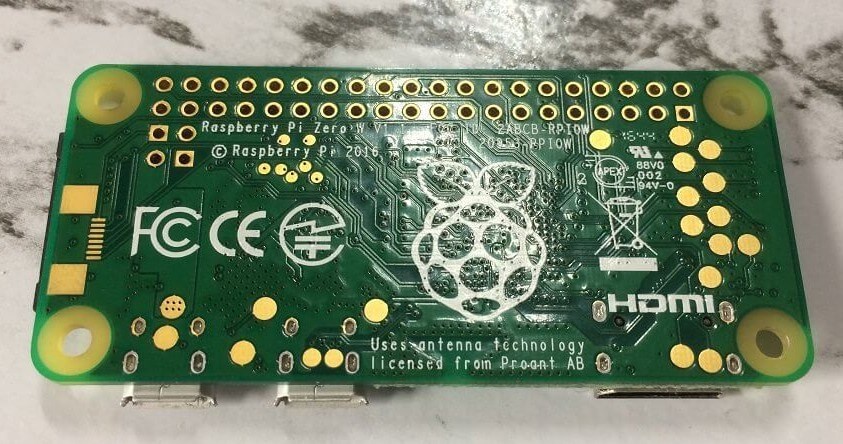
The back side of the microcomputer circuit board is completely smooth. There is not a single electronic component protruding above the surface of the board.
But the copyright is applied, in particular – the mention of the used antenna technology from the Swedish company Proant AB.
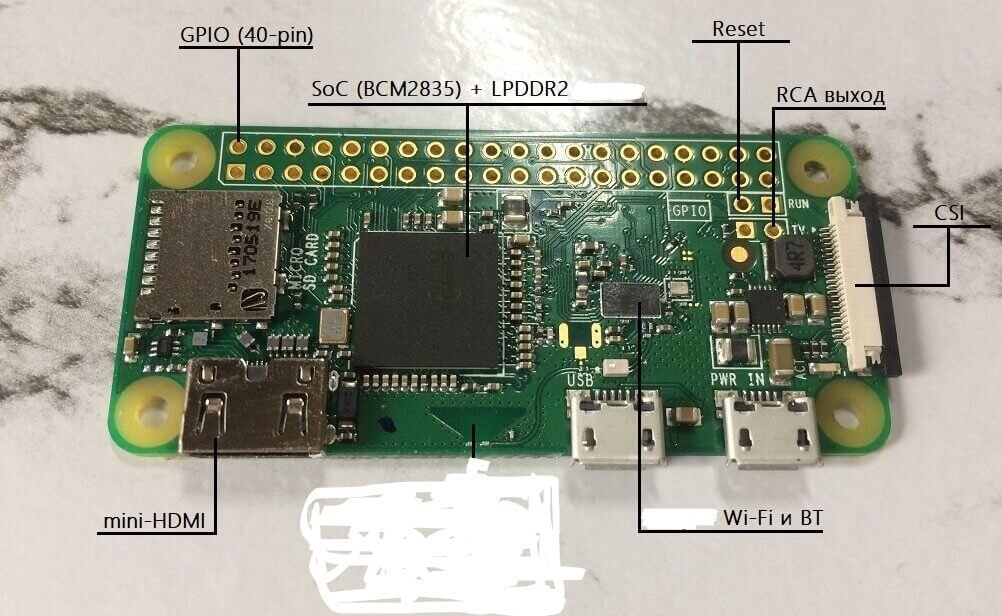
All electronic components are wired to the top of the board. An unusual solution – the processor and RAM modules are soldered to each other. Below is the SoC Broadcom BCM2835 , and right above it is the LPDDR2 Elpida B4432BBPA-10-F 512 MB memory module.
To the right is the Bluetooth and Wi-Fi module, similar to that used in the Raspberry Pi 3 . It can be seen how a winding track departs from it, ending with a trapezoidal antenna – that same licensed solution from Proant AB, mentioned in copyrights on the back of the board.
In order to minimize the thickness of the microcomputer, the GPIO comb is not soldered – not all users will need it. Two combs with different connectors are included, soldering them is a task for 10-15 minutes. There are also unsoldered connectors for connecting the Reset button and for connecting an analog RCA output, which can be used as an alternative to a mini-HDMI connector.
The case from the set is made in the Raspberry Pi Foundation signature colors – white and red.
I really liked the availability of removable covers. Need access to the GPIO – put the cover with a slot, not needed – a solid cover. There is a proprietary camera module – we install it under the cover with a slot-eye, and the Raspberry Pi Zero W turns into a compact IP-camera.
Need to connect both the camera and peripherals to the GPIO? And this option is possible, we put the cover with a slot for the GPIO, and the camera loop is passed out through the slot at the bottom of the case.
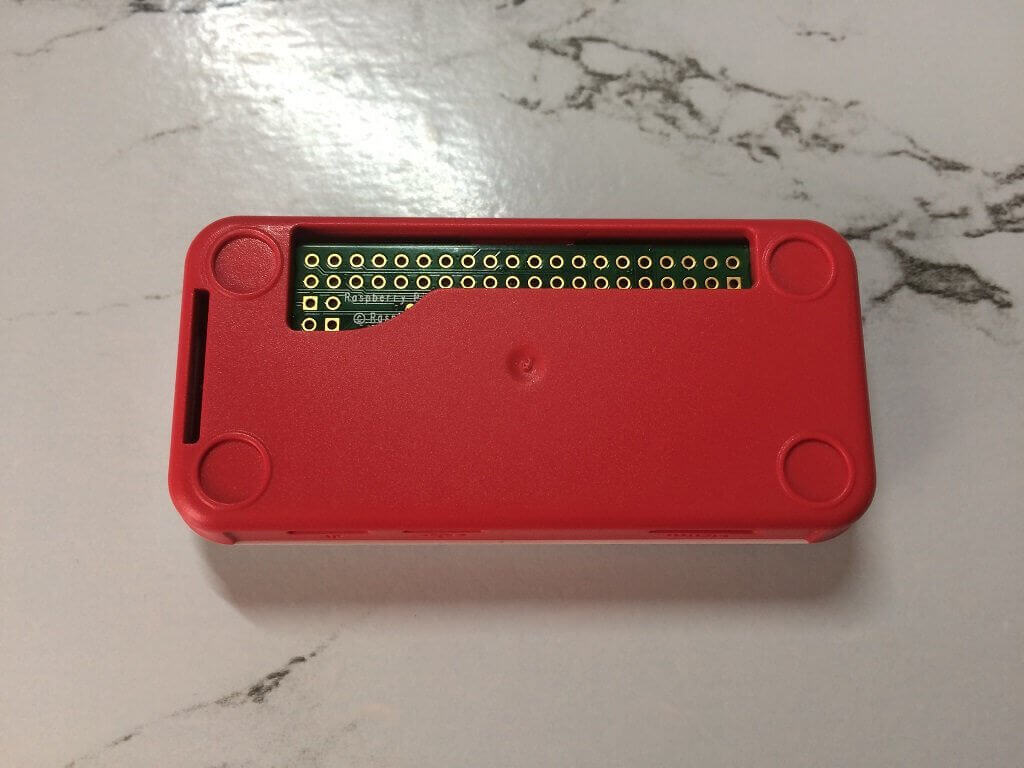
The microcomputer board is mounted on a latch. First, insert it onto the two pins in the front, then push it with your finger in the GPIO area.
The top cover is attached to the latches. It holds tightly and can be easily removed – you just need to pry it with a fingernail or a thin screwdriver.
And to pull out the microcomputer, press on it from the back through the hole on the bottom.
On the left you can see the aforementioned slot for the CSI loop, through which you can bring the camera module out from the back.
Getting started with the Raspberry Pi Zero W
During experiments with the Banana Pi Zero, I had to connect the microcomputer to the monitor via a mini-HDMI cable (it was lucky that it was available), and then alternately connect the mouse or keyboard to the only free microUSB connector through the OTG adapter in order to Connect to Wi-Fi and get the ability to remotely control.
With the Raspberry Pi Zero W, things are much simpler. Installing the operating system and connecting to a local network can be done without using a monitor and keyboard, in the so-called headless mode.
To get started, download the latest Raspbian image from the official site https://www.raspberrypi.org/downloads/raspbian/.
And write it to a microSD-card using any of the programs intended for this (Rufus, Win32DiskImager, Etcher, etc.).
After writing the image, you need to open the microSD card and create two files there: ssh (without extension) and wpa_supplicant.conf
We leave the ssh file empty (it is needed in order to activate SSH access, which is disabled by default in Raspbian), and in wpa_supplicant.conf, enter the following:
ctrl_interface = DIR =/var/wpa_supplicant GROUP = netdev
update_config = 1
network = {
ssid = "WIFI ACCESS POINT NAME"
psk = "WIFI PASSWORD"
key_mgmt = WPA-PSK
}
It is important to note that both the password and the name of the access point are case sensitive.
make sure that both files are recorded on a card with the system, and load our microcomputer from this card.
If the Wi-Fi access point name and its password are specified correctly, then the Raspberry Pi Zero W should automatically connect to the local network and get a local IP address, which can be viewed on the router.
Knowing the IP address, we connect via SSH with the standard username and password pi : raspberry .
The microcomputer is ready to work, Webmin can be installed for greater convenience.
Heating and cooling
The operating temperature of the Raspberry Pi Zero W processor in idle time is 41.2 ° C.
To assess the potential heat, install the stress utility and run the test for 15 minutes:
sudo apt-get install stress
while  true ;  do vcgencmd measure_clock arm ; vcgencmd measure_temp ; sleep 10 ;  done & stress - c 4  - t 900
During the test, the processor temperature reached 55.1 ° C and stabilized.
After the test was completed, the temperature almost immediately dropped to 50.3 ° C, then gradually continued to decrease.
We conclude that the microcomputer does not need additional cooling.
Of course, you can stick a copper radiator on the SoC (like the ones that are installed on my Raspberry Pi 3 ): this obviously will not get any worse, but there is no point in such an upgrade.
Use cases for the Raspberry Pi Zero W
IP camera
Using the official camera module and housing with a hole for the eye of this camera, you can turn a microcomputer into a cheap and very compact IP camera. The cost of the turnkey solution will be at the level of the cheapest IP cameras available on the market today.
Portable Console The
compact dimensions, low heat and 40-pin GPIO interface make the Raspberry Pi Zero W a good platform for building a terminal or portable console.
Automation device
Relatively low cost, GPIO-interface and an extensive user community allow you to use a microcomputer to solve automation problems in cases where the Arduino or ESP8266 is not enough, and the performance of the Raspberry Pi 3 is excessive.
Advantages and disadvantages
Advantages:
- Low price
- Cold processor
- Large user community
Disadvantages:
- Single core processor
Conclusion
I liked this microcomputer more than Banana Pi Zero .
Of the significant advantages, it is worth noting that by buying a device from the Raspberry Pi line you get access to the collective experience of a vast user community, and if you had any problem, then it was almost certainly already resolved by the community. Another advantage is the wide range of accessories produced for the full-length “raspberry,” compatible with its miniature counterpart.
A high-quality and functional case and the lack of heating of the processor make the Raspberry Pi Zero W a good acquisition for not very resource-intensive tasks.
It seems to me the most interesting to use it as a budget IP-camera, and in the following blog articles, I will try to highlight this topic.


Leave a Reply