Raspberry Pi First steps in the configuration (basic configuration)Tested with Raspbian Stretch

After the initial start-up of Raspberry Pi you should make a basic configuration before going into possible installations and configurations.
This includes the configuration of language, character set, time zone and a German keyboard layout. In addition, you should also change the default password of the user “pi” and make a software update of the system. After that, the basic configuration of Raspberry Pi is already done.
Basic configuration with the graphical user interface and VNC

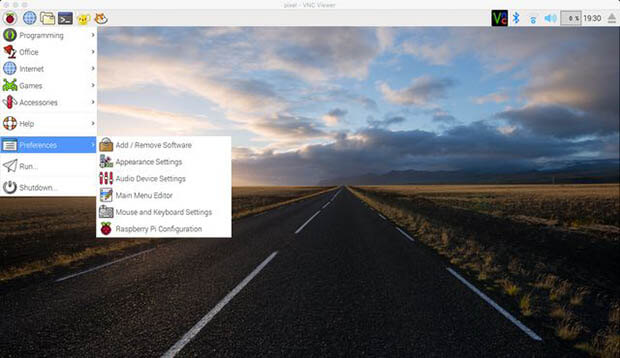
There is a configuration tool for configuring Raspbian under “Preferences> Raspberry Pi Configuration”. This allows you to quickly configure important things without having to enter complicated commands on the command line.
Some changes ask if you want to restart the system. Basically, you can first make all changes and then restart.
Basic configuration with the command line and via SSH
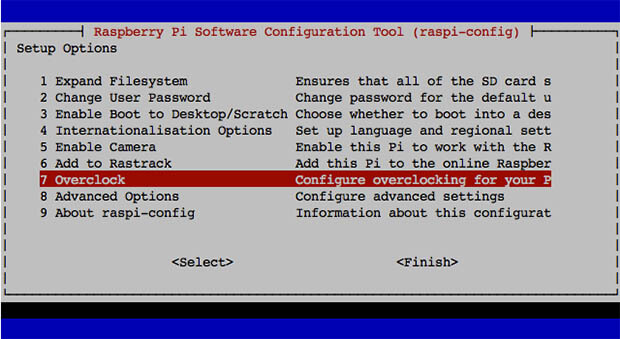
For the basic configuration, Raspbian brings the command line tool “Raspberry Pi Software Configuration Tool”, with which you can quickly configure the important things without having to enter complicated commands on the command line.
sudo raspi-config

Basic configuration: step by step
Depending on the application and requirement, additional or different configuration steps may result.
- change language
- Change keyboard assignment
- Change time zone
- Change Wi-Fi country code
- Change default password
- Change hostname (optional)
- Enable SSH and recreate SSH keys (optional)
- Set screen resolution (optional)
- Expand file system (optional)
- Update software
- Change the name of the network interfaces
Note: Almost all configuration changes take effect after a reboot. But you can make almost all changes together and then take over with a restart all changes together.
1. Change language
Those who speak English can pass this attitude. In general, however, you can prefer the display and presentation in the language you want
- Menu Order: Set Preferences / Raspberry Pi Configuration / Localization / Speech Environment
Apply the setting with “OK”. You can then make further settings or exit the configuration tool by clicking on “OK”. If so, reboot to start the system with the changed settings.
2. Change keyboard assignmentAs a rule, all images that have an English language setting also have an English keyboard layout. This setting is about setting the keyboard layout as the buttons are printed. By default, if you wish to change the keyboard layout >>
- Menu order: Preferences / Raspberry Pi Configuration / Localization / Set Keyboard
Here you can select the following values in the fields:
- Country (Country): Japan / Japan
- Variant: JP / JP
There are several options for the keyboard variant. You should choose the variant that is likely to fit the keyboard.
3. Change time zoneThe time zone determines the correct time at a particular location. The default is usually wrong. Therefore, you have to choose the time zone in which you are and whose time you want to get displayed correctly.
- Menu order: Preferences / Raspberry Pi Configuration / Localization / Set Timezone
4. Change the WiFi country codeWith the WLAN country code one selects a kind profile for the use of the frequency spectrum, in which WLANs are operated. Almost every country has set a different operating permit for this, which is defined in a country profile.
- Menu order: Preferences / Raspberry Pi Configuration / Localization / Set Wifi Country
Here you can select the following values in the fields:
- Country (Country): JP Japan
Note: If the country code remains at the default value “GB”, then the integrated and external WiFi adapter may not detect WiFi.5. Change default passwordEvery standard installation reveals standard users with standard passwords. After commissioning, these default passwords must be changed. With Raspberry Pi with Raspbian, this only affects the user “pi”. If you are running a Raspberry Pi on the network, the first thing you should do is change the password .
- Menu order: Preferences / Raspberry Pi Configuration / System / Change Password
Note: After initial startup a Raspberry Pi is generally recommended to change the default password of the user “pi”. If you leave it on “raspberry”, then strangers can access the Raspberry Pi. And that both locally via screen and keyboard, as well as via SSH over the network.
6. Change host name (optional)The host name determines under which computer name Raspberry Pi can be reached in the network. By default, a fresh Raspbian has the host name “raspberrypi”. Maybe you want to change that. For example, if you operate several. Then you might want to distinguish them by name.
- Menu order: Preferences / Raspberry Pi Configuration / System / Hostname / OK
The new host name can be entered in the text field with the given name. It is saved with a click on “OK”, but only taken over with a new start.
If you want to do it manually:
sudo hostname -b {NEWER_NAME}
Then briefly check:hostnameNote: It is recommended that you change the hostname using Raspberry Pi Configuration Tool.It is important that if you have changed the hostname, you also recreate the SSH keys.
7. Enable SSH and recreate SSH keys (optional)
Images of distributions contain a key to the SSH server that authenticates Raspberry Pi to the client. If you have a corresponding image on his SD memory card pulled, then this key is the same everywhere. A key should be unique, otherwise it is not suitable for secure authentication. Therefore, you should change this key during an initial configuration.
First we delete all the files in which the keys are located. There are several of them.
sudo rm /etc/ssh/ssh_host_ *
Then we perform a reconfiguration of the SSH server. The creation of the key files is automatic.
sudo dpkg-reconfigure openssh-server
For a new Raspbian image, SSH is disabled or off by default. You can activate it via “raspi-config” or activate and start it on the command line.
Automatically start SSH (enable):
sudo systemctl enable ssh
Start SSH:
sudo systemctl start ssh
After re-login via SSH you will have to reconfirm the identity of the Raspberry Pi.
Establish connection to the command line via SSH
8. Set screen resolution (optional)
Normally, Raspbian sets himself the appropriate resolution. It can sometimes be useful to change them.
sudo raspi-config
Here you can find the setting of the resolution in “Advanced Options / Resolution”.
9. Expand file system (optional)If a Linux distribution has just been written to an SD card, then the root partition does not occupy the entire memory card, but leaves some of it unused. When you first launch a newly flashed Raspbian Jessie (as of 2016-05-10), the file system automatically expands to the total size of the memory card. That is why it is usually not necessary to extend file system.
- Menu order: Preferences / Raspberry Pi Configuration / System / Expand Filesystem
After that a restart is absolutely necessary.10. Update softwareEspecially with the first commissioning and basic configuration, it is important to bring the system up to date on the software side. Updating all installed applications and libraries of a Raspbian after the initial startup consists of two steps.
sudo apt-get update
sudo apt-get dist-upgrade
Depending on the application and requirement, you should be careful with subsequent updates. With the update you can also shoot a system with its configuration.
11. Change the name of the network interfaces
Since Raspbian Stretch, the Ethernet and WLAN network interfaces have different names. So no longer “eth0” and “wlan0”, but “enx …” and “wlx …”. This concerns USB-connected network adapters, which deviate from the usual designations. This means that in network configuration you first have to determine the individual name or change the naming convention to the old one.
Important: Restart Raspberry Pi
After making extensive changes to the configuration, you should always reboot Raspberry Pi.
sudo reboot
Only when the system has taken over the changes and then runs smoothly, you can use the system for experiments and further configuration.
Extension: Network configuration
If you want to access a Raspberry Pi more often via SSH, then a static IP configuration is recommended. You set up a fixed IPv4 address that does not change on its own.
- Set up a fixed IPv4 address for Raspberry Pi
- Turn on and configure IPv6 on Raspberry Pi
- Set up a fixed IPv6 address for Raspberry Pi
- Change hostname of a Raspberry Pi
- Solve network problems with Raspberry Pi
An alternative to the static IPv4 address is the Zeroconf service, also known as Bonjour on Windows and Apple, and Avahi on Linux. Zeroconf is an announcement service that promotes printers and computer names on the local network. In this way you can access the Raspberry Pi via computer name with SSH and do not need to configure IPv4 addresses.
- Set up Zeroconf / Bonjour / Avahi on Raspberry Pi
- Raspberry Pi command line
- Raspberry Pi: Start, stop, restart, enable and disable services
- Raspberry Pi: set up remote maintenance and remote desktop with VNC, RDP and SSH
- Establish connection to the command line via SSH
- Set up VNC server on Raspberry Pi (X11VNC)
- Set up desktop sharing via VNC with RealVNC on Raspberry Pi
- Set up XRDP remote desktop on Raspberry Pi

Leave a Reply