Raspberry pi as router must not only distribute the Internet from the Ethernet port, but also from one WiFi adapter to another. This is very useful when traveling. For example, in a hotel it is easy to be in a room where a local access point finishes up badly. A powerful WiFi adapter will even catch a weak signal and distribute it to all available tablets and phones. It can also help save money where Internet charges are taken from each device separately.

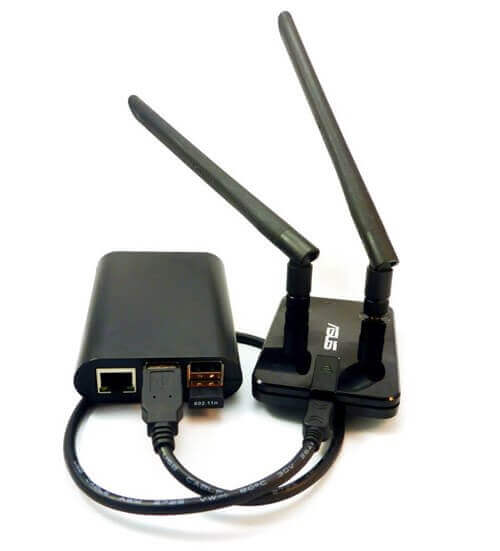
Appearance of the router on the Raspberry pi with adapters Asus N14 and No brand Wifi adapter
What you need:
- Raspberry Pi
- Wifi adapter
Preparatory steps
Almost every command from this article needs to be run under the super user. You can run Midnight Commander under the super user and calmly edit the system files and execute any commands.
sudo mc
Packages update
All Raspberry Pi manuals begin with advising you to upgrade everything you can. Following the canon, I will write these commands:
apt-get update
You can still update the Raspberian itself.
apt-get upgrade
Remote access to Raspberry Pi
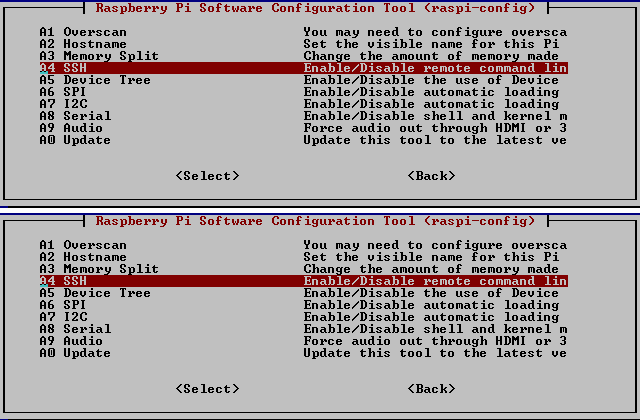
If you do not have SSH enabled, then you should enable it in the settings of Raspberry Pi. You can start the settings with the command:
raspi-conf
There we go to the section Advanced Options -> SSH. And turn it on.

To connect to the Raspberry Pi via ssh, you can use mRemoteNG , and you can use the utility ssh, it is available in Linux and Windows.
Here, 192.168.1.2 is the IP address of Raspberry, To find out what IP address your Raspberry received, you can go to the Admin interface of your home router or view information about interests on the Raspberry itself through the command ifconfig
For remote access to Raspberry desktop, I tried to configure VNC. Spent a lot of time in the end nothing good came out. Easier way is to use XRPD.
apt-get install tightvncserver
apt-get install xrdp
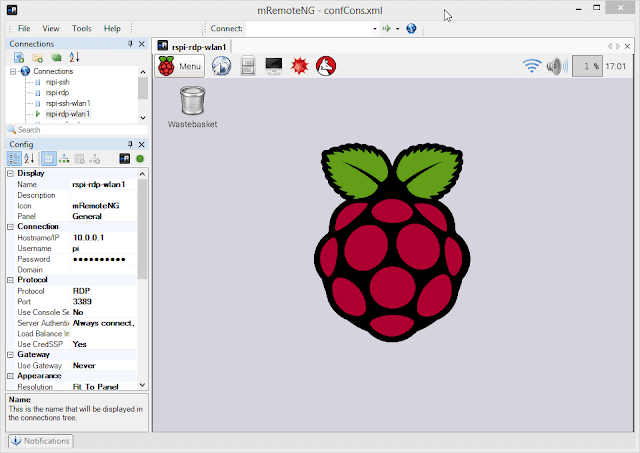
After executing this command, nothing else needs to be configured. To connect to Raspberry from Windows, take mstsc or a program like mRemoteNG and connect to Raspberry Pi 2 using the login and password of the user Raspberrian.

access Raspberry pi via MRemote
By the way, it is convenient to configure the Raspberry Pi, if you connect it to the local network via an Ethernet cable. Thus, the settings of the WiFi-adapters will not cut off you from Raspberry.
When configuring the router, it is convenient to backup the SD card after each step, for this you can use something like Acronis True Image or Linux utility dd : it will be easy to roll back so if something went wrong.
When setting up the router, you will need to edit several configuration files. It seemed to me convenient to create a folder, sort of, /home/pi/vrouterand put soft-link and all the necessary configs there. This should be done during the installation, because the configs themselves appear only after the installation of the corresponding programs.
ln -s /etc/network/interfaces interfaces
ln -s /etc/wpa_supplicant/wpa_supplicant.conf wpa_supplicant.conf
ln -s /etc/dnsmasq.conf dnsmasq.conf
ln -s /etc/hostapd/hostapd.conf hostapd.conf
ln -s /etc/default/hostapd hostapd_default
ln -s /etc/rc.local rc.local
ln -s /etc/sysctl.conf syctl.conf
ln -s /etc/udev/rules.d/70-persistent-net.rules 70-persistent-net.rules
ln -s /etc/dhcpcd.conf dhcpcd.conf
Interface configuration (Old versions of Raspberrian before Stretch)
To let u know which interfaces we have, execute the command ifconfig
$ ifconfig
eth0      Link encap:Ethernet  HWaddr b8:27:eb:0f:10:4e
          inet addr:192.168.1.2  Bcast:192.168.1.255  Mask:255.255.255.0
          UP BROADCAST RUNNING MULTICAST  MTU:1500  Metric:1
          RX packets:98 errors:0 dropped:1 overruns:0 frame:0
          TX packets:72 errors:0 dropped:0 overruns:0 carrier:0
          collisions:0 txqueuelen:1000
          RX bytes:13006 (12.7 KiB)  TX bytes:12910 (12.6 KiB)

lo        Link encap:Local Loopback
          inet addr:127.0.0.1  Mask:255.0.0.0
          UP LOOPBACK RUNNING  MTU:65536  Metric:1
          RX packets:8 errors:0 dropped:0 overruns:0 frame:0
          TX packets:8 errors:0 dropped:0 overruns:0 carrier:0
          collisions:0 txqueuelen:0
          RX bytes:1104 (1.0 KiB)  TX bytes:1104 (1.0 KiB)

wlan0     Link encap:Ethernet  HWaddr 00:13:ef:c5:10:2e
          inet addr:192.168.1.28  Bcast:192.168.1.255  Mask:255.255.255.0
          UP BROADCAST RUNNING MULTICAST  MTU:1500  Metric:1
          RX packets:63 errors:0 dropped:13 overruns:0 frame:0
          TX packets:30 errors:0 dropped:0 overruns:0 carrier:0
          collisions:0 txqueuelen:1000
          RX bytes:7905 (7.7 KiB)  TX bytes:4702 (4.5 KiB)

wlan1     Link encap:Ethernet  HWaddr e0:3f:49:eb:b3:90
          inet addr:192.168.1.5  Bcast:192.168.1.255  Mask:255.255.255.0
          UP BROADCAST RUNNING MULTICAST  MTU:1500  Metric:1
          RX packets:76 errors:0 dropped:15 overruns:0 frame:0
          TX packets:31 errors:0 dropped:0 overruns:0 carrier:0
          collisions:0 txqueuelen:1000
          RX bytes:10266 (10.0 KiB)  TX bytes:4501 (4.3 KiB)
If instead of wlan0, eth0, etc. You see something like “wlx00e01ce3030f” or “enxb822ebfb32ad”, you have “predictable network interface names” turned on in them raspi-config
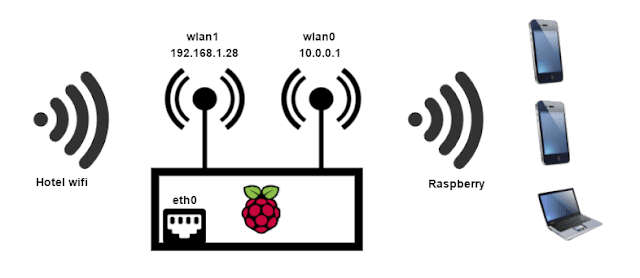
The output of the command shows the following interfaces:
- eth0 – wired Ethernet adapter. We will use them to connect to the Raspberry at the time of setup. From it you can also take interent.
- lo – loop back, it is localhost, it is not interesting to us.
- wlan0 is a simple Chinese noname WiFi adapter with which I will distribute internet. On it we will develop the Raspberry network. The adapter must support master-mode.
- wlan1 – I have this powerful Asus N-14 WiFi adapter with which I will catch the Internet.

The router is connected to the network 192.168.1.0 distributes the Internet to the network 10.0.0.0
Distribute the Internet connection from the wlan0 adapter. This way we can disable the second adapter if we want to use eth0 as the source of the Internet and wlan1 will be unnecessarily needed.

We change the interface configuration as follows:
nano /etc/network/interfaces
auto lo
iface lo inet loopback

auto eth0
allow-hotplug eth0
iface eth0 inet manual

auto wlan1
allow-hotplug wlan1
iface wlan1 inet manual
wpa-conf /etc/wpa_supplicant/wpa_supplicant.conf

allow-hotplug wlan0
iface wlan0 inet static
address 10.0.0.1
network 10.0.0.0
netmask 255.255.255.0
broadcast 255.0.0.0
The point of this configuration is that eth0 and wlan1 are configured automatically. And wlan0 has a static IP address 10.0.0.1. At this IP address, you can connect to the Raspberry Pi via SSH or VNC even if the other adapters are turned off.
Wlan1 takes Internet connection settings from /etc/wpa_supplicant/wpa_supplicant.conf . This file may be needed in the future to add new networks.
Here is an example. wpa_supplicant.conf
ctrl_interface=DIR=/var/run/wpa_supplicant GROUP=netdev
update_config=1

network={
    ssid="ASUS"
    psk="password123"
    key_mgmt=WPA-PSK
}

network={
 ssid="NoPasswordNetwork"
 key_mgmt=NONE
}
Configuring Interfaces in Raspberrian Stretch
In Raspberrian Stretch, the configuration of interfaces has changed a lot, and I think that this moment will be further developed and changed further. At the moment (April 4, 2018), you need to manage the interfaces through /etc/dhcpcd.confand through wpa_supplicant. You can immerse yourself in this topic from this post https://raspberrypi.stackexchange.com/a/37921/32956.
Set a static IP for the wlan0 interface. To do this, add the following 2 lines to the end of the file:
interface wlan0
static ip_address=10.0.0.1/8
The remaining interfaces will automatically connect to the Internet.
Currently, Stretch has such a problem that wpa_supplicant is still trying to connect wlan0 to an available WiFi network and get an IP. We do not need this, because wlan0 will be used by hostapd and must have a static IP 10.0.0.1.
There are two ways to prevent wpa_supplicant from connecting wlan0 to the network.
1-First patch the file /lib/dhcpcd/dhcpcd-hooks/10-wpa_supplicant. There, at the end, there are lines
if [ "$ifwireless" = "1" ]  && \
    type wpa_supplicant >/dev/null 2>&1 && \
    type wpa_cli >/dev/null 2>&1
then
replaced by
if [ "$ifwireless" = "1" ]  && [ "$interface" != "wlan0" ]  && \
    type wpa_supplicant >/dev/null 2>&1 && \
    type wpa_cli >/dev/null 2>&1
then
I don’t really like the idea of patching hooks.
2-The second way is to create a separate wpa_supplicant configuration file for wlan0 /etc/wpa_supplicant/wpa_supplicant-wlan0.conf with the following code:
ctrl_interface=DIR=/var/run/wpa_supplicant GROUP=netdev
update_config=1
If no settings for networks are specified for wlan0, wpa_supplicant will not be able to connect wlan0 to any network.
Raspberry 3 wlan0 issue
Raspberry 3 has its own wifi adapter. The good news is that it does not hang on the usb-bus and if you distribute the Internet through it, then you can reach the maximum speed of Wifi.
However, the bad news is that the Raspberry Pi 3 does not always mount the built-in adapter, like wlan0. If a wi-fi adapter is already hanging on the USB bus, then it can become wlan0, and the integrated adapter becomes wlan1. This is not convenient, because it is “hard” to fix wlan0 for the built-in adapter. To do this, add a rule to the file.
/etc/udev/rules.d/70-persistent-net.rules
SUBSYSTEM=="net", ACTION=="add", DRIVERS=="?*", ATTR{address}=="b8:27:eb:53:4d:fd", ATTR{dev_id}=="0x0", ATTR{type}=="1", KERNEL=="wlan*", NAME="wlan0"
Where b8:27:eb:53:4d:fd is the mac-address of the built-in adapter (you can recognize it with the help of the command ifconfig
Dnsmasq
Dnsmasq is a DHCP server that will distribute IP schniki in our new network. It is very easy to install:
apt-get install dnsmasq
Dnsmasq will raise its own service, and you will only need to configure it. It is worth saying that dnsmasq.config is well documented.
nano /etc/dnsmasq.conf
# disables dnsmasq reading any other files like /etc/resolv.conf for nameservers
no-resolv
# Interface to bind to
interface=wlan0
except-interface=wlan1
except-interface=eth0
# Specify starting_range,end_range,lease_time
#address=/#/10.0.0.1
dhcp-range=10.0.0.3,10.0.0.20,12h
# dns addresses to send to the clients
server=8.8.8.8
server=8.8.4.4
log-facility=/var/log/dnsmasq.log
log-queries
interface=wlan0 indicates the interface on which dnsmasq will wait for incoming DHCP requests. Wlan1 and eth0 are the interfaces with which we catch the Internet.
Sysctl.conf
Turn on packet forwarding, for this we fix the /etc/systcl.conf file:
nano /etc/sysctl.conf
By default, all settings in this file are commented out. To configure the router, it is important that the following settings be uncommented:
net.ipv4.ip_forward=1
net.ipv6.conf.all.forwarding=1
Iptables
Configure NAT. Let the iptables settings be set when Raspberry starts, for this we will fix the file rc.local
nano /etc/rc.local
Let’s get two variables:SOURCE- an Internet source adapter – and DEST- an adapter that distributes the Internet. So it will be convenient for us to change the appointment of adapters.
#!/bin/sh -e
#
# rc.local

SOURCE=wlan1
DEST=wlan0

iptables -t nat -A POSTROUTING -o $SOURCE -j MASQUERADE
iptables -A FORWARD -i $SOURCE -o $DEST -m state --state RELATED,ESTABLISHED -j ACCEPT
iptables -A FORWARD -i $DEST -o $SOURCE -j ACCEPT

exit 0
In the future, to change the source of the Internet from wlan1 to eth0, we only need to change SOURCE=wlan1 to SOURCE=eth0. Other configuration files will not have to change.
Hostapd
hostapd is a utility that will make an access point from a WiFi adapter. It translates the WiFi adapter into master mode and lifts the bridge between the adapters by itself. hostapd can be run from the console with the command hostapd [path_to_config]. But we need wlan0 to become an access point immediately after downloading Raspberry. Because we need to run hostapd as a service. To do this, we will configure the path to the hostapd config file /etc/default/hostapd.
nano /etc/default/hostapd
DAEMON_CONF="/etc/hostapd/hostapd.conf"
Now we will configure a config hostapd.conf. It is with him that various difficulties arise.
nano /etc/hostapd/hostapd.conf
For starters, you can try to use the config for a simple network without authorization with the default driver:
interface=wlan0
ssid=Raspberry_Free
hw_mode=g
channel=6
auth_algs=1
wmm_enabled=0
If you managed to connect to the Internet with this configuration, then you can configure the authorization. And if the connection did not work out, then there is probably a problem with the driver. You need to find a description of your network card and learn how to install the driver of your network card in Raspberrian.
My config looks like this.
interface=wlan0
driver=nl80211
ssid=Raspberry
channel=3
country_code=US
ieee80211d=1
ieee80211n=1
wmm_enabled=1
hw_mode=g
#auth
wpa=2
wpa_passphrase=picupcake
wpa_key_mgmt=WPA-PSK
wpa_pairwise=TKIP
rsn_pairwise=CCMP
auth_algs=1
macaddr_acl=0
ignore_broadcast_ssid=0

# control
logger_syslog=-1
logger_syslog_level=2
logger_stdout=-1
logger_stdout_level=2

ctrl_interface=/var/run/hostapd
ctrl_interface_group=0
You can see if hostapd service is active with the help of the command service –status-all.
Performance
In my opinion, the speed of the WiFi router on the Raspberry depends not so much on the Raspberry itself, but on the WiFi adapter that was used to distribute the Internet. For example, the Chinese No-Name adapter gave me a speed of ≈20 megabits / s, and the Asus N14 is a little more than 30 megabits / s. It is also worth considering that the WiFi adapter can consume a lot of power, more than the USB port of the Raspberry Pi can provide. In this case, the adapter can slow down, lowering its power consumption. You can compete with this by using a USB hub with additional power, or by using a special USB cable.
It is worth paying for some options hostpad.conf, which can improve performance:
country_code=US
ieee80211d=1
ieee80211n=1
wmm_enabled=1
hw_mode=g

Leave a Reply