
What is Fluxion Fluxion is a security audit and research tool for social engineering. The script tries to get a password (WPA / WPA2 key) from the target WiFi access point, using social engineering ( Fake Access point).
The advantage of this approach is that it does not require a long brute force on a powerful iron. The downside is that social engineering attacks do not always work.
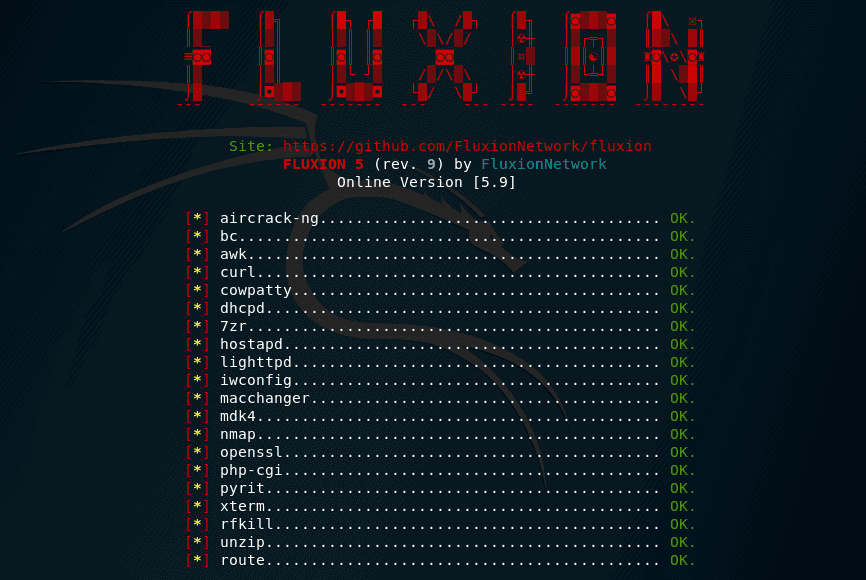
How to install Fluxion in Kali Linux
Installation of the Tool is performed as follows:
git clone https://github.com/FluxionNetwork/fluxion
cd fluxion/
sudo ./fluxion.sh
Please note that we did not manually install the Fluxion dependencies, because the first time you start the Tool, it will check for the missing dependencies and install them.
When downloading the Tool files, you can specify the –recursive flag and then the Tool itself will be downloaded, as well as additional options for Intercept Portals (those web pages that the victim sees on his device during the attack):
git clone https://github.com/FluxionNetwork/fluxion --recursive
The Tool has an automatic mode, with which the initial command can set data for an attack, and the Tool will run on autopilot. But for now this is more experimental mode.
To make life a little easier, stop the Network Manager and end the processes that may hinder us:
sudo systemctl stop NetworkManager.service
sudo airmon-ng check kill
A typical Tool launch, go to its folder:
cd fluxion/
The Tool is updated very often, so to download the latest version, run the command:
git pull
And run:
sudo ./fluxion.sh
Choose a language:

We need to grab a handshake. It will not be used for brute-force (there will be no brute-force at all). But it is necessary to verify that the user entered the correct password. Therefore, we choose point two:
[2] Handshake Snooper Acquires WPA/WPA2 encryption hashes.

Select a channel on which to search for targets:

They say that five seconds after the appearance of the target point of the AP, close the Fluxion scanner. The access point search window opens:

When you see the desired target, close the new window, the list of access points will be displayed in the main Tool window:
When entering the number of the access point that we will attack, do NOT necessary to enter the zeros that go before the actual number.

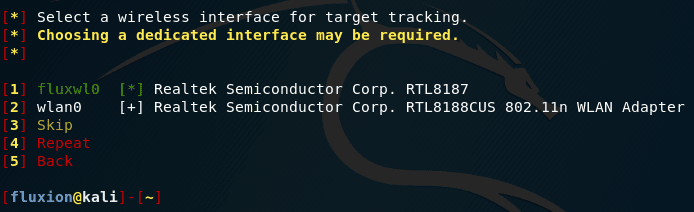
Choose an interface to track goals:

We are offered three methods for obtaining a handshake:
[*] Select a method of handshake retrieval

 [1] Monitor (passive)
 [2] aireplay-ng deauthentication (aggressive)
 [3] mdk4 deauthentication (aggressive)

The handshake is captured at the moment when the client connects to the access point. When choosing passive surveillance, we will wait until the client connects or reconnects to the Access Point for natural reasons. We will be invisible, but such waiting can last many hours.
With the aggressive method, we will send frames that will cause clients to disconnect from the access point. Since most devices immediately try to connect again, we will very quickly get the handshake we need.
Select a method of verification for the hash
Choosing a Handshake Test Method Here we select the Tool with the help of which it will be determined whether enough frames have already been captured to verify the password or not:

How often to check for a handshake:

Now we are asked how verification should take place. A choice of options
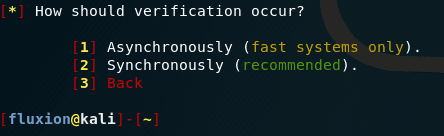
With the asynchronous method, verification of whether a handshake has been captured will be carried out even when data capture continues. On slower systems, this can cause problems, since new data can be written before pyrit … stripLive processes existing data. As the Tool runs, when the amount of stored data continues to accumulate, the likelihood of a problem increases. The author recommends avoiding using this option, or limiting it in situations where the handshake file can be captured relatively quickly.
In the synchronous version, before checking the handshake, the data capture will be suspended to avoid your described problem. The downside of this method is that during the test we stop listening to the broadcast and grab handshakes. This means that while the verification is in progress, we can skip the handshake.

Three additional windows will appear periodically. If a handshake is captured, i.e. the attack was completed with success, then such an entry will appear in one of the windows, and the other windows will be closed and the attack will be stopped:

Now go to the attack Captive Portal.

Many of the wireless cards used in pentesting support the addition of a virtual wireless interface. This interface can be in monitor mode or in access point (AP) mode. Thanks to this feature, when creating a fake access point and simultaneously killing a real access point, you can use one single WiFi card. And Fluxion can do it.
For information about these virtual interfaces and how to check them, see this article , section “ Testing the functionality of the virtual interface ”.
But starting with version four, another function has been added to Fluxion – follow the attacked access point . The problem is that some access points, when they are attacked with deauthentication, change the channel on which they operate. As a result, they become invulnerable to our attack, you have to stop Fluxion, re-select the target and launch the attack. The essence of the function following the attacked access point is that Fluxion regularly checks on which channel the access point is running, and if it changed the channel, Fluxion automatically restarts the attack on the correct channel.
So, if you want to use the pursuit function, then you need a second wireless card that can go into monitor mode. If you do not have it, you can skip the use of this function.
We launch the second attack:
[1] Captive Portal Creates an "evil twin" access point.

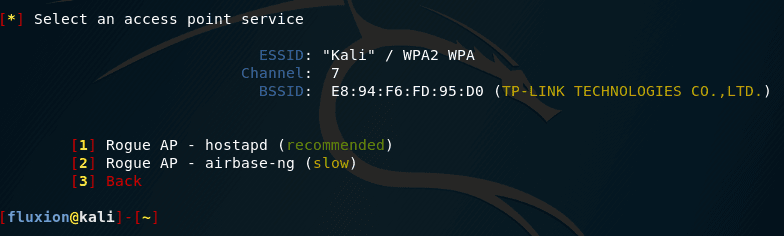
Fluxion targets the above access point. We agree:

Choose an interface for tracking goals – this is the new feature that I mentioned just above. If you have two wireless interfaces, select the one you want to use with this feature. If the interface is one, then click ” Skip “:
Now we select the interface for jamming (choose another one that is different from the one chosen for the pursuit, otherwise there will be problems):
If you do not have a separate wireless card to create an access point, then select the same interface that you selected for jamming (this is normal and if the wireless card supports adding a virtual interface, then everything will work fine):
Select the Tool that will create the access point. The authors recommend avoiding airbase-ng if you use the same WiFi card both to create an access point and for deauthentication (jamming):
If you have already taken a handshake, a message will be displayed that it has been found. You can use it or specify the path to another.
Re-select the handshake verification method:
Next, we select the SSL certificate source for the intercept portal. Options:
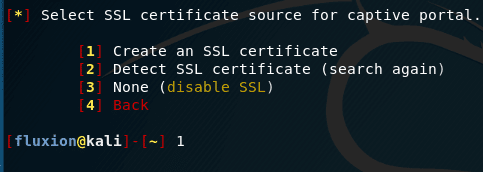
We can use SSL certificate or disable it. SSL is an encryption method used to establish a secure connection between two points. In this case, these points are the web server of the intercepting portal and the target client.
If you have a personalized certificate, you must save it to fluxion / attacks / Captive Portal / certificate / server.pem and the attack will automatically detect it and select it.
If you do not have a personal certificate, you can select the option to automatically generate it. The disadvantage of this approach is that the self-generated certificate will not be trusted for any device, and a warning will most likely appear in the browser that the connection to the intercept portal is not secure.
If you do not want to mess with SSL, then you can choose to disable it. If this is done, the web server of the intercept portal will only accept unencrypted connections during data transfer to fluxion. It must be remembered that the data to our fraudulent point is transmitted over the open network in an unencrypted form – if a third party monitors the network traffic, then it can see this data. Also now some web browsers show a warning if data from the form is sent over an unencrypted connection.
In my opinion, in real life it is better to use SSL, since practically all websites work via HTTPS – and there are more chances that a user clicks on “Go over an insecure protocol” than to wait for a chance that he will nevertheless try to open the site on HTTP.
Next we are told to choose the type of Internet connection for the fraudulent network.
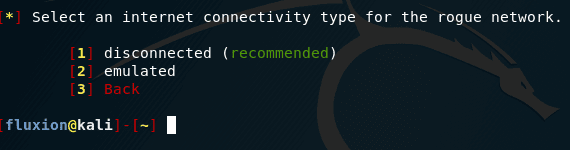
This option only affects iOS clients and some Android clients.
Emulating an Internet connection can be useful for an attacker who does not want to make an intercepting portal obvious. Clients will be connected, but the device will be fooled to believe that there is Internet access. This will lead to the fact that the intercepting portal will not be shown to iOS clients and some Android clients immediately after connecting to the fraudulent network, it will be shown as soon as clients try to open any website.
Select the intercept portal interface for the fraudulent network. By default, neutral pages are available, suitable for all cases in different languages
Warning: this can lead to freezing of clients who are trying to download the site, including iOS clients. The problem occurs when the option to emulate an Internet connection is selected and SSL is disabled. The reason is that the client is trying to connect to a site with SSL, such as google.com, but hangs while waiting for a connection from the server of the intercept portal. Hangup due to the fact that customers believe that Internet access is present, but the Intercept Portal is not configured to respond using the SSL protocol.
Now the attack starts – many windows will open.
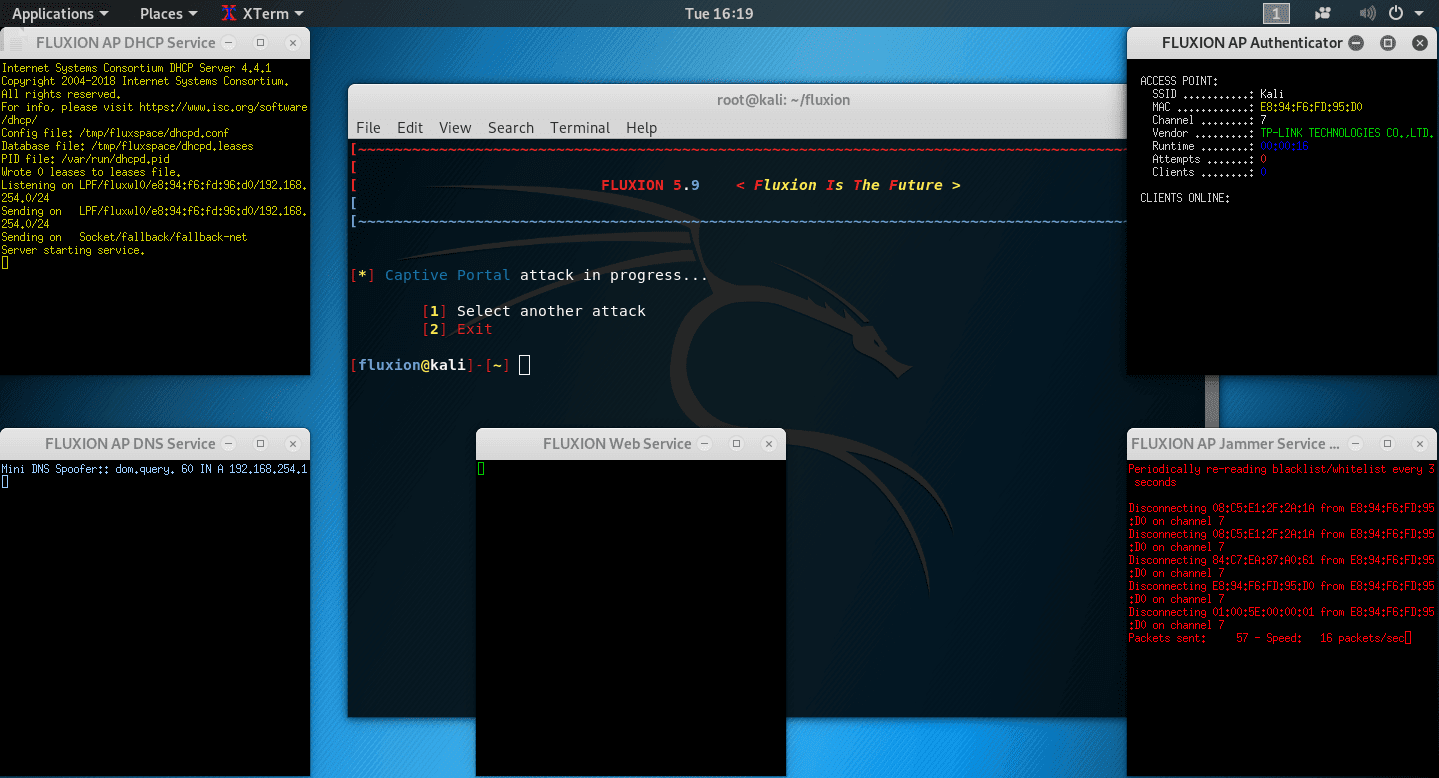
Clients will be disconnected and they will not be able to connect to the true network during the entire duration of the attack. But another network will appear for them – without a password, to which you can connect with one tap,
If the client connect to the fake AP then when trying to open any site, he will be redirected to the Intercept Portal
All entered data is transferred to Fluxion, which checks in real time whether the correct password is correct or not. If the password is not correct, then the Intercept Portal is displayed, and the attack continues:
If the password is correct, it is shown to the attacker, and the attack itself stops immediately. After that, the client (victim) device will automatically connect to the original access point and it will receive its normal Internet connection.
Additional options for Web Porting
There are Portals versions that imitate different models of routers in different languages, they are in this repository: https://github.com/FluxionNetwork/sites
When you are in the Fluxion folder , you can install them all with the command:
git clone https://github.com/FluxionNetwork/sites ./attacks/Captive\ Portal/sites/
OR this command:
git submodule update --init --recursive
OR initially download Fluxion with the –recursive flag :
git clone https://github.com/FluxionNetwork/fluxion --recursive
You do not need to download them all – you can download some manually, then place them in the folder fluxion / attacks / Captive Portal / sites / .
How to create a new layout of the Intercept Portal from the web interface of your router
You can create your own intercepting portal site using your router’s login page as a design. How to make a clone of the page and how to prepare it to work with Fluxion is written in their wiki:
- https://github.com/FluxionNetwork/fluxion/wiki/Downloading-router-portals
- https://github.com/FluxionNetwork/fluxion/wiki/Prepping-protals-for-fluxion
You need to know HTML and understand how data is sent via web forms. If it is interesting to someone, but you cannot understand the English description – write in the comments, I will translate that material.
Frequently asked questions and answers
Clients are not automatically connected to a fake access point.
This is an attack of social engineering and there is no point in automatically connecting customers. The script relies on the fact that the user is present in order to connect to the fake access point and enter the credentials of the wireless network.
No internet connection on fake hotspot
It should not be. All traffic is merged to the Intercepting Portal, this is ensured by fake DNS responses to capture the credentials.
Captive Portal is not shown on my device!
There may be several reasons for this, for example:
- DNS reroute script did not work properly
- in this case, the yellow window processing DNS requests will not show the redirection data
- Client not connected to fake AP
- Clients realized that fake AP has no Internet connection and uses mobile traffic instead.
Is my wifi coming up?
Check the output of the iw list command , find there data like this:
Supported interface modes:
         * IBSS
         * managed
         * AP
         * AP/VLAN
         * monitor
         * mesh point
         * P2P-client
         * P2P-GO
The important lines are AP and monitor , if one of them is missing, your wifi card most likely does not fit. If you need advice on which card to buy, then see below.
Attack Captive Portal does not create an access point
The most common reason for this is that the driver does not support virtual interfaces. The Captive Portal attack in Fluxion can use a virtual interface to simulate the presence of a second wireless adapter: one is used to silence the target access point, and the second is used to create an “evil twin” access point, i.e. Evil Double. An example of a relatively popular driver that does not support a virtual interface is realtek-rtl88xxau-dkms.
I need to log in (on Android)
This is how the script works. The fake intercepting portal is configured by the script itself to collect account data. This is not a glitch – this is how it should be.
Fake access point MAC address different from original
The fake access point MAC address differs by one octet from the original one in order to prevent clients from deauthenticating themselves with fluxion during an attack.
Why are all my interfaces purple / negative (-)?
Negative interfaces are currently used by other processes.
To forcefully stop using busy interfaces, start fluxion with the FLUXIONWIKillProcesses flag :
export FLUXIONWIKillProcesses=1; ./fluxion.sh
And what if I want to run fluxion with a few flags?
Separate the flags with command delimiters (colons ‘ ; ‘):
export FLUXIONWIKillProcesses=1; export FLUXIONWIReloadDriver=1; ./fluxion.sh
Where are the handshakes?
You will find all saved handshakes in the folder fluxion / attacks / Handshake Snooper / handshakes
What wireless card should I buy?
Any card from this list will do : WiFi adapters that support monitor mode
For information about the important characteristics of wireless cards, how to check them and find out the capabilities of the driver, see the article “ How to determine which WiFi adapter is suitable for Kali Linux ”.
great job taking your time to write all this…
Greetings,
when I am asked to enter an absolute Path what should I enter?
If I insert this path to a file created by me it gives me an error
/home/anto/Scrivania/handshake/dump-01.cap
—
~~~~~~~~~~~~~~~~~~~~~~~~~~~~~~~~~~~~~~~~~~~~~~~~~~~~~~~~~~~~~~~~~~~~~~~~~~]
[ ]
[ FLUXION 6.9 ]
[ ]
[~~~~~~~~~~~~~~~~~~~~~~~~~~~~~~~~~~~~~~~~~~~~~~~~~~~~~~~~~~~~~~~~~~~~~~~~~~~]
[*] Inserisci il percorso del file di handshake (Esempio: /…/dump-01.cap)
[*] To go back, leave the hash path blank.
Path assoluto: /home/anto/Scrivania/handshake/dump-01.cap
[*] Error, path points to non-existing or empty hash file.
The error message you’re encountering suggests that the path you entered points to a non-existing or empty file. Here are a few things to check and consider when entering an absolute path:
File Existence: Ensure that the file at the specified path actually exists. You can use the ls command to list the contents of the directory and verify the file’s presence.
File Permissions: Make sure you have the necessary permissions to access the file. You can use the ls -l command to check the file’s permissions.
Absolute Path: The path should be an absolute path starting from the root directory (e.g., /home/anto/Scrivania/handshake/dump-01.cap). Relative paths (e.g., handshake/dump-01.cap) may not work correctly.
File Type: Ensure that the file you’re specifying is indeed a capture file with a .cap extension, which typically contains wireless handshake data.
Case Sensitivity: Linux is case-sensitive, so make sure the file path and name match the actual file, including correct capitalization.
File Content: Check that the file is not empty and contains the expected data. You can use the file or cat command to examine the file’s content.
Directory Structure: Verify that the directories leading up to the file exist. In your case, check that /home/anto/Scrivania/handshake/ exists.
If you’ve confirmed that the file does exist, has the correct permissions, and is not empty, and you’re still receiving this error, there may be an issue specific to the tool or script you’re using (Fluxion). You might want to check the documentation or seek help from the tool’s community or support resources for assistance with troubleshooting this particular issue.
How to make custom site?
Hey sir fluxion not deauth clinet but it’s created fake Ap I’m using Alfa adapters